Skip to product information
1 of 1

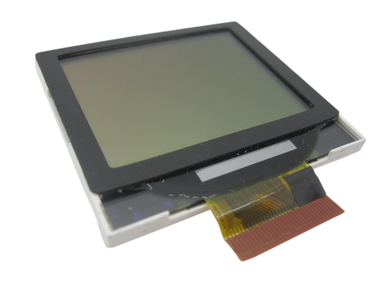
iPod Mini 1G — Replacement LCD Screen (1.67" Grayscale)

iPod Mini 1G — Replacement LCD Screen (1.67" Grayscale)

Regular price $22.73 USD
Regular price Sale price $22.73 USD
Sale Sold out

Product Overview

This screen listing covers Replacement LCD Screen (1.67" Grayscale) and its own connector path on the iPod Mini 1st Generation.

Use the Compatible Variants table below to confirm capacity, color, or order-number fitment.

Choose this part when your iPod shows backlight not working or LCD display failure; the checks below help confirm the right part before you order.

What Is Included

Replacement LCD Screen (1.67" Grayscale) Free plastic pry opening tool 1 year warranty

Quick Diagnosis: Is It The Replacement LCD Screen (1.67" Grayscale)?

Start here before ordering. Work through the checks in order; a symptom alone does not prove this screen is bad until nearby parts, cables, fitment, or install issues are separated.

Before you order this screen

  1. Try a force restart first. Toggle Hold on and off, then hold Menu + Select/Center for 6 to 10 seconds.
  2. Reseat and inspect the connector path. Inspect the relevant ribbon and board connector before replacing the part.
  3. Check for liquid or connector damage. Look for lifted latches, bent contacts, debris, corrosion, creases, or torn flex material.
  4. Check the next listed clue. Check whether the symptom changes after careful reseating.
  5. Use this listing only after the checks still point here. If the symptom still points here after those checks, compare Compatible Variants before ordering this screen.

Specifications & Fitment

Part Details

Detail Value
Model Number A1051
EMC EMC 1984
Condition Used — factory original Apple part. Normal cosmetic wear expected.
Size 1.67 inches
Resolution 138x110 pixels
Type Grayscale
Controller Renesas HD66753

Compatible Variants

Order Number Capacity Color Case Compatible Notes
M9436LL/A 4GB Blue Yes
M9437LL/A 4GB Gold Yes
M9434LL/A 4GB Green Yes
M9435LL/A 4GB Pink Yes
M9160LL/A 4GB Silver Yes

Failure Signs

Use these checks to decide whether this screen is the right part, whether a nearby part should be checked first, or whether the symptom needs more diagnosis.

Liquid, corrosion, or residue context

What you may see: Symptoms follow liquid exposure, dirty contacts, corrosion, or residue.

Most likely cause: Liquid or corrosion can involve this part, a nearby connector, or a board path.

Look elsewhere when: Check the Replacement Battery when power, charging, runtime, or swollen-battery behavior is the main problem.

  • Check the Replacement Click Wheel (632-0246-A) when controls, wheel, center/select, menu, hold, or unresponsive-button symptoms are the main problem.

Blank, white, black, lined, or backlight display

What you may see: People describe a blank screen, white or black display, missing backlight, lines, or a display that changes after impact or repair

Check first: Confirm the iPod still plays, charges, or is recognized so the screen symptom can be separated from a dead device

  • Inspect the display ribbon and connector if the iPod has been opened or dropped
  • Look for cracks, liquid residue, display discoloration, or connector damage before ordering

Do Not Buy This Screen Yet If...

Situation Start here instead
Variant or capacity does not match this listing All iPod Mini 1G variants are 4GB and use the same screen; confirm this is a 1st-generation Mini (order number M9160LL/A or M9434LL/A-M9437LL/A), not a Mini 2nd Generation, before ordering.
Cable, computer, sync, or port behavior is the primary problem Start with the dock connector, cable, host, or port checks when sync or port behavior is the main problem.
Charging, swelling, runtime, or power is the primary problem Start with the battery, charger, and power checks when charging, runtime, swelling, or no-power behavior is the main problem.
The problem is the Hold switch or headphone jack, not this part Verify the Hold slider, lock indicator, and shared headphone/Hold cable before replacing this part.
Recent service or connector disturbance is the main clue Inspect and reseat the cable, latch, or connector path disturbed during service before buying another part.
A symptom points to a different part Start with battery for power/runtime symptoms; hard-drive cable for folder, clicking, or restore symptoms; dock-port bracket for dock, sync, or charge-port symptoms; click wheel for click-wheel or control symptoms; logic board for board-side damage or multi-system symptoms before buying this part.

Install Overview

Before You Start

Confirm the model and reset state

Turn Hold off, use the reset sequence for this generation, and confirm the model and variant before opening the iPod.

Open the case slowly

Treat case opening as the highest handling risk. Work around the seams gently and stop if the shell, clips, or internal stack resist.

Protect nearby connectors

Do not pull the halves apart or side-load board sockets. Reseat nearby ribbons and connectors before blaming a replacement screen.

Guide checkpoint

Open ribbon-cable latches only as described; over-lifting or side-loading the latch can damage the connector. Reseat and protect the display ribbon during reassembly before assuming the panel itself is bad.

Repair Guide

Repair guide summary: iPod Mini Display Replacement.

DifficultyModerate
Time30 minutes - 1 hour
Steps15
SolderingNo
Common toolsPhillips #00 Screwdriver, Flathead 3/32" Screwdriver, Spudger
Show all 15 installation steps
1

Confirm that the hold switch is locked before you open the iPod.

2

Carefully slide a small flathead screwdriver or Jimmy into the seam between the metal casing and white plastic top. Lever up the white top bezel, taking care not to damage the soft plastic. The top bezel is adhesive-backed, so you may need to lever it up from several spots before it releases. Heat up the adhesive for a few seconds with a hair dryer on low heat to make the job easier.

3

Raise the top bezel off the iPod.

4

Carefully slide a small flathead screwdriver or Jimmy into the seam between the metal casing and white plastic bottom. Lever up the white bottom bezel, taking care not to damage the soft plastic.

5

A small pair of snap-ring pliers is the best tool to take out the metal retaining bracket. You can also lever out the metal retaining bracket beneath the bottom bezel with a flathead screwdriver. Release the bracket by pressing in the corner metal arms first.

6

Lift the released bracket away and set it aside.

7

In this step, be careful, this connector is fragile. With a spudger or fingertip, carefully disconnect the orange click wheel ribbon from the logic board.

8

Take out the 2 #00 Phillips screws securing the headphone jack to the casing.

9

Carefully move the iPod out of its casing by pressing on the logic board near the click wheel's bottom edge. Do not tug on the headphone jack board at the iPod top; its logic board connector is fragile.

10

After the logic board has been pushed out far enough, gently grip it on either side of the display and keep sliding the iPod from its casing.

11

Raise the battery off the logic board and set it to the side of the iPod.

12

With a spudger, flip up the black plastic tab securing the orange display ribbon in place. The black tab can rotate up 90 degrees, releasing the ribbon cable. This tab is fragile so take care not to break it.

13

In this step, note the location of the four white plastic clips securing the display to the logic board. These clips must be released before the display can be removed.

14

With a spudger or fingertip, release the four white plastic tabs.

15

In this step, turn the iPod over. Carefully raise the display up and move it out of its connector.

After This Repair

Check What to do
Test image and backlight Check the display before closing the case fully, then confirm brightness and image stability after reassembly.
Watch for pressure New spots, lines, or bowing after closing usually means the internal stack or ribbon routing needs another look.
Still not working? Reseat the display ribbon and inspect the connector before treating the replacement screen as bad.

Frequently Asked Questions

Use these questions to narrow the part path before ordering. They keep each answer focused on a different diagnostic or fitment decision.

What Replacement LCD Screen (1.67" Grayscale) models does this fit?

This Replacement LCD Screen (1.67" Grayscale) fits: M9160LL/A (4GB Silver), M9434LL/A (4GB Green), M9435LL/A (4GB Pink), M9436LL/A (4GB Blue), M9437LL/A (4GB Gold).

Do I need to solder?

No, this installation does not require soldering. Difficulty: Moderate. Estimated time: 30 minutes - 1 hour.

How do I know if this LCD screen needs replacement?

Symptoms that can point to this LCD screen include: backlight not working, LCD display failure. Check fitment, connectors, and nearby parts before treating symptoms as proof.

Why people land on this part

Use the checks above to separate this screen from nearby parts before ordering.

Also searched as: iPod mini 1st generation LCD screen replacement, no backlight, blank screen, display not lighting up, backlight not working, LCD display failure, ribbon cable, display ribbon, a blurred screen, black horizontal lines on screen, Inner Display, iPod screen repair, monochrome LCD display.

Symptoms people describe

  • blurred screen
  • dark spots and lines
  • dark spots on screen
  • ipod mini blank screen
  • ipod mini no backlight
  • ipod mini screen blank but plays music
  • ipod mini screen fading
  • ipod mini screen goes white
  • ipod mini screen not working
  • ipod mini white screen
  • white stripe through it

Fitment wording people compare

  • blue-white LED backlight
  • iPod mini a1051 screen
  • iPod mini first generation display
  • iPod mini Gen 1 Display
  • iPod mini inner display
  • iPod mini LCD panel
  • iPod mini LCD screen
  • iPod mini monochrome LCD
  • iPod mini screen module
  • iPod mini screen replacement

Questions people ask

  • Can I use diagnostic mode to check the screen?
  • iPod turns on but screen is black.
  • My iPod mini's display is blank.

Worth Knowing

  • Grayscale display driven by Renesas HD66753 LCD controller (chip-on-glass, inside LCD module).
  • Verify board/LCD revision before ordering display.
  • Genuine Apple Parts
  • One Year Warranty
  • Satisfaction Guaranteed
View full details