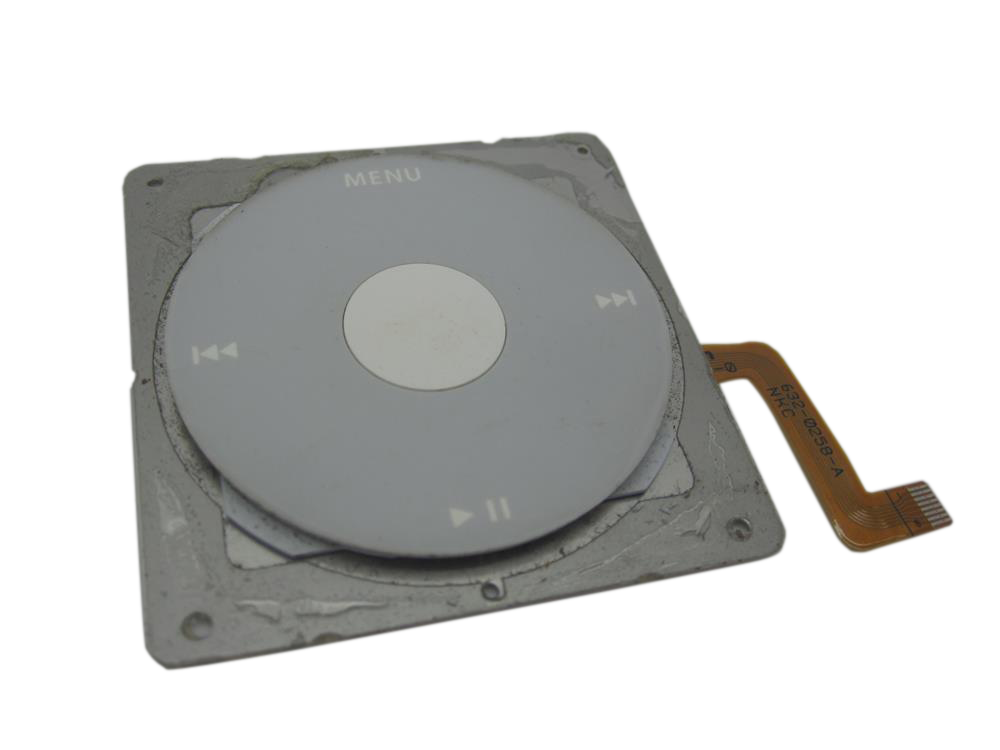
Replacement control input part for iPod Photo (4th Generation). Use it when the wheel, buttons, center Select area, or flex is physically damaged or still fails after Hold state, frozen software state, and connector seating are checked.
Product Overview
Choose this click wheel listing to restore wheel, button, and center-Select input on the iPod Photo (4th Generation) when the control assembly or its flex is damaged or unresponsive.
Use Part Details for the confirmed part-number reference. Use the Compatible Variants table below to confirm capacity, color, case, or order-number fitment.
What you are buying. This click wheel is a used, factory-original Apple part, and it is the only version we offer for this iPod — there is no new-part alternative and no condition to choose at checkout. Expect the light cosmetic wear of a twenty-year-old part; what we check is that it scrolls, clicks and selects.
Choose this part when Click Wheel Not Working remains after Hold state, Menu + Select reset, swollen-battery, storage, ribbon, and connector checks; the checks below help confirm the right part before you order.
What Is Included
Condition: Used factory-original part. Quantity and exclusions: The listed part, set, pair, or configuration above is supplied with exactly one plastic pry tool. No other parts, tools, adhesives, or materials are included unless they are explicitly listed above.
Quick Buying Check
Buy this when
- Click Wheel Not Working: Use the controls check after checking Hold state, force-restart behavior, ribbon seating, and whether the issue affects the whole wheel or just one button.
Diagnose first when
- Unlock Hold, then hard-reset with Menu + Center/Select for 8-10 seconds before ordering.
- If the battery is visibly swollen, bulging, or pressing on the case, replace the battery first and retest the center button and click wheel.
- If the lock icon stays on or Hold behavior is suspect, check the headphone jack / Hold switch assembly before blaming the click wheel.
Do not buy for
- Check the battery for swelling first when the center button is the main complaint.
- Check Hold switch, logic-board connector damage, and liquid/corrosion evidence before treating the click wheel as a guaranteed fix.
- Check the headphone jack / hold-switch assembly first when the device is locked or the Hold slider is suspect.
Specifications & Fitment
Also known as iPod with color display (Apple's official name after June 2005).
Part Details
| Detail | Value |
|---|---|
| Model Number | A1099 |
| EMC | EMC 2022 |
| Condition | Used — factory original Apple part. Normal cosmetic wear expected. |
| OEM Part |
632-0258-A — listings for both the monochrome and the color fourth-generation iPod print this number, so buy the wheel sold for the color model (A1099) and expect that number on it. |
Compatible Variants
| Order Number | Capacity | Color | Case | Compatible | Notes |
|---|---|---|---|---|---|
| MA127LL/A | 20GB | Black/Red (U2) | thin | Yes— compatible | Owner-verified: Compatible 20GB U2 Special Edition / black-red thin variant |
| MA079LL/A | 20GB | White | thin | Yes | Owner-verified: fits all iPod Photo / Color Display variants, thin and thick. |
| MA215LL/A | 20GB | White (Harry Potter Collector's Edition) | thin | Yes— compatible | Owner-verified: Stock match |
| M9829LL/A | 30GB | White | thin | Yes | Owner-verified: fits all iPod Photo / Color Display variants, thin and thick. |
| PS492AA | 30GB | White (HP) | thin | Yes | Owner-verified: fits all iPod Photo / Color Display variants, thin and thick. |
| M9585LL/A | 40GB | White | thick | Yes | Owner-verified: fits all iPod Photo / Color Display variants, thin and thick. |
| M9586LL/A | 60GB | White | thick | Yes | Owner-verified: fits all iPod Photo / Color Display variants, thin and thick. |
| M9830LL/A | 60GB | White | thick | Yes | Owner-verified: fits all iPod Photo / Color Display variants, thin and thick. |
| PS493AA | 60GB | White (HP) | thick | Yes | Owner-verified: fits all iPod Photo / Color Display variants, thin and thick. |
Failure Signs
Use these checks to decide whether this click wheel is the right part, whether a nearby part should be checked first, or whether the symptom needs more diagnosis.
| Symptom | What it means & what to check |
|---|---|
| Center / Select button does not respond or stops clicking |
What you may see: People describe the center, middle, or Select button as no longer clicking, selecting, or responding.
Check first: Open the iPod and inspect the battery. If it is visibly swollen, bulging, or pushing the case outward, replace the battery first and retest the center button.
Most likely cause: On this model, a swollen battery can press against the back of the click wheel assembly and prevent the center button dome switch from actuating.
Look elsewhere when: Check the battery for swelling first when the center button is the main complaint If the lock symbol is active or the Hold slider is not behaving correctly, check the headphone jack / hold-switch assembly before blaming the click wheel.
|
| Hold switch can look like click-wheel failure |
What you may see: The iPod may appear locked, ignore controls, or behave differently when the Hold switch position changes.
Check first: Check whether the lock indicator changes when the Hold switch moves.
Most likely cause: On this model the Hold switch belongs to the headphone jack / hold-switch assembly, not the click wheel.
Look elsewhere when: Check the headphone jack / hold-switch assembly first when the device is locked or the Hold slider is suspect. |
| Click wheel is partly or fully unresponsive |
What you may see: People describe the scroll ring, buttons, or the whole control area as intermittent, partly responsive, or completely dead.
Check first: Confirm Hold is off.
Most likely cause: Whole-wheel symptoms can involve the click-wheel assembly, ribbon seating, ground path, or contamination on contacts.
Look elsewhere when: Check the battery for swelling first when the center button is the main complaint Check Hold switch, logic-board connector damage, and liquid/corrosion evidence before treating the click wheel as a guaranteed fix.
|
| Ribbon, connector, or ground-path checks |
What you may see: A symptom starts after opening the iPod or disturbing an internal flex cable. Check first: Inspect for liquid, corrosion, residue, torn flex material, or connector damage. Most likely cause: Connector seating, ribbon damage, or ground-path issues can involve this part, a nearby connector, or a board path. Look elsewhere when: Check the Replacement Headphone Jack (Thin - 20/30GB) when headphone audio, one-ear sound, crackling, or hold-switch behavior is the main problem.
|
| Controls stopped responding after a repair |
What you may see: A common repair pattern is that the iPod powers up after battery, hold-switch, or click-wheel work, but the controls no longer move or select normally.
Check first: Reopen only as far as needed to inspect ribbon seating and latch position.
Most likely cause: Post-repair control failure can point to a disturbed click-wheel ribbon, loose latch, missing ground path, or nearby hold-switch ribbon issue.
Look elsewhere when: If the symptom began during battery or headphone/hold work, inspect those disturbed ribbons before ordering another click wheel. |
| Red X | A red X is the iPod's own diagnostic saying it cannot use its hard drive. It is a storage-path symptom, not a control one: check the hard drive, the hard-drive cable, and the flash-mod storage path. A new click wheel cannot clear it. |
Search Language
Click Wheel Not Working after reset
Use this listing when scrolling, Menu, Select, Play/Pause, Previous, or Next still fails after Hold is unlocked and Menu + Select reset has been tried.
Swollen battery pressing controls
On this iPod the battery lies behind the click wheel, so a swollen pack presses the wheel and center-button area from behind: the Select button goes hard or stops clicking while the scroll ring and the other buttons still work. Replace the battery first, then retest the controls. Stop charging a swollen pack and never press a lifted case back down.
Broken, cracked, loose, or worn wheel
Physical click-wheel damage belongs here after the iPod Photo / iPod with color display fitment is confirmed.
Repair considerations
Run these checks before replacing the click wheel — they confirm the click wheel is the right fix and not a nearby fault:
- Confirm Hold switch state before replacing controls
- Replace Click Wheel or control assembly
Do Not Buy This Click Wheel Yet If...
| Situation | Start here instead |
|---|---|
| You see a folder icon, clicking noise, or restore failure | Check the drive or flash media, storage cable, adapter seating, formatting, and restore path before replacing any part. A folder with an exclamation mark means the iPod cannot find its storage — the drive, its ribbon cable, or the software on it. A sad-face iPod icon is the same message in the older style: it cannot use its hard drive. |
| Charging, swelling, runtime, or power is the primary problem | Replace a swollen battery first, then retest the wheel and center button after pressure is gone. |
| The problem is the Hold switch or headphone jack, not this part | Diagnose the exact-model headphone-jack/Hold assembly and its connector before choosing another part. |
| Variant or capacity does not match this listing | Start with the headphone/Hold assembly when the lock state or Hold slider is suspect. |
| A symptom points to a different part | Start with battery for power/runtime symptoms; hard-drive cable for folder, clicking, or restore symptoms; LCD screen for display-only symptoms; headphone jack for audio or Hold-switch symptoms; logic board for board-side damage or multi-system symptoms before buying this part. |
Install Difficulty
Difficulty
Moderate front-panel service. Open the case carefully before releasing the click-wheel adhesive and plastic tab.
Soldering
No soldering is required for the click-wheel replacement path.
Common tools
Use plastic opening tools and a spudger; avoid metal prying against the wheel flex or front-panel plastic.
Before closing
Test Menu, Select, Play/Pause, Previous, Next, scrolling, and Hold behavior before snapping the case fully shut.
Disassembly Guide
Show all 16 installation steps
Before you open the iPod, confirm that the hold switch is in the locked setting. The orange bar should be showing, indicating hold is active.
Move an opening pick as far as possible into the gap between the plastic front and the metal back panel, on the right edge of the iPod. You may have to rock the pick back and forth to move it in farther. With the opening pick, lever up against the plastic front panel and release 5 retaining tabs. Slide the pick along the iPod edge and keep levering gently until the remaining retaining tabs release. In this step, after all five tabs along the right edge are free, the case should easily open.
The iPod case is now open, but do not separate the two halves yet. An orange ribbon cable still connects the headphone jack to the logic board. With the dock connector edge at the top, open the case like a book and set the rear panel beside the iPod front half.
With a plastic tool or your fingernails, carefully detach the orange headphone jack cable. Make sure to draw straight up on the connector, not the cable itself. This fragile ribbon cable can stay connected for a battery replacement. Prop and tape the rear case against a box so the headphone jack remains connected to the motherboard without straining its cable while you work.
Grasp the hard drive with one hand and carefully detach the orange ribbon cable from the hard drive with your other hand. In this step, if the cable doesn't come free easily, it may be useful to gently wiggle the cable from side to side.
Peel up and back the black adhesive strip covering the hard drive ribbon cable.
With a fingertip or spudger, carefully flip up the black hard drive cable connector on the logic board. The black retaining clip rotates 90 degrees toward vertical in the cable direction.
Draw the orange hard drive cable directly out of its connector.
Carefully detach the white battery connector from the logic board. Pull only on the connector housing, not the cables.
With a spudger, flip up the black retaining bars holding the display and click wheel connectors to the logic board. On an iPod Photo, the display connector sits more centrally on the logic board.
Take out the black T6 Torx screws holding the logic board to the front panel. On this iPod there are 5, not the 6 the shared guide picture shows — there is no screw in the top right corner.
Move the orange click wheel ribbon cable out of its connector. Unlock this connector first: the locking mechanism sits on the opposite side of the cable entry and swivels upward 90 degrees. Lift the locking mechanism with a plastic spudger.
Carefully raise the large end of the logic board, then detach the display connector. Raise the logic board out of the iPod.
Lift the display panel free and remove it from the device. Mild adhesive may still attach the display to the front panel.
With a spudger, work under the edge of the cell and lever it up off its adhesive a little at a time, then lift it out. Never pull on the battery leads, and never bend, crease or puncture the cell. If the pack is swollen, stop: do not lever it, and have it handled and recycled as a damaged lithium cell. Raise the battery up and out of the iPod.
Only the front panel remains.
Product-specific placement, reassembly, and check
- Prepare and access. Confirm the exact model and listing fit first. Use the existing steps as a disassembly guide, gather the specified tools, disconnect power where applicable, and keep screws and cable positions organized.
- Place Replacement Click Wheel. Align the control part with its locating features and seat only the matching ribbon or mechanical interface for this listing.
- Reassemble without force. Reverse only the access steps needed for this repair, keep cables clear of case edges and screw posts, and close clips in stages.
- Validate before final closure. Before final closure, test navigation and every affected button; reopen the fit if a control binds, sits low, or does not register consistently.
Stop condition: Stop if a connector, latch, screw, clip, housing edge, or the replacement part resists normal alignment. Recheck model fit, orientation, cable routing, and trapped hardware instead of forcing it.
After This Repair
| Check | What to do |
|---|---|
| Test every control | Check Menu, Select, Play/Pause, Previous, Next, scrolling, and Hold behavior before closing the case fully. |
| If controls are still odd | Reseat the control ribbon, confirm the Hold switch is off, and inspect any ground strap or latch touched during service. |
Frequently Asked Questions
Use these questions to narrow the part path before ordering. They keep each answer focused on a different diagnostic or fitment decision.
What Replacement Click Wheel models does this fit?
This Replacement Click Wheel fits: M9585LL/A (40GB White), M9586LL/A (60GB White), M9829LL/A (30GB White), M9830LL/A (60GB White), MA079LL/A (20GB White), MA127LL/A (20GB Black/Red (U2)), PS492AA (30GB White), PS493AA (60GB White).
Do I need to solder?
No, this installation does not require soldering. Difficulty: Moderate. Estimated time: 30 minutes.
How do I know if this click wheel needs replacement?
Symptoms that can point to this click wheel include: Click Wheel Not Working, broken wheel, scroll wheel trouble, and center-button trouble after Hold, reset, battery, storage, and connector checks. Check fitment, connectors, and nearby parts before treating symptoms as proof.
What if only the center or Select button fails?
Confirm Hold is off. Separate center-button-only behavior from a dead scroll ring or multiple failed buttons. Inspect the click-wheel ribbon and ground path if the iPod was opened. Open the iPod and inspect the battery. If it is visibly swollen, bulging, or pushing the case outward, replace the battery first and retest the center button.
Is this an iPod Classic?
Apple's 'Classic' branding started with the 6th Generation (2007). This is the color-screen iPod photo / iPod with color display generation, not a Classic-branded model.
The clicker wont work?
Use the Quick Buying Check, Failure Signs, and Do Not Buy sections together before ordering. The symptom should still point to this click wheel after nearby parts and fitment are separated.
Why people land on this part
Use the checks above to separate this click wheel from nearby parts before ordering.
Some buyers search for "buttons not working" or "middle button stuck"; confirm the checks above point to this same part before ordering.
Also searched as: wont restore, center button not working, clicking drive, frozen on hold, center/middle/select button stuck, sad face, screen locked, won't click, won't reset, iPod Photo click wheel repair service, Hold Switch Stuck, Frozen / Unresponsive, hold button, click wheel unresponsive, clickwheel, iPod photo 4th gen click wheel, A1099 click wheel, click wheel dead, where to buy iPod Color Display click wheel, iPod Photo click wheel installation, iPod Colour Display, where to buy iPod Photo click wheel, A1099 iPod, click ring, hard reset, headphone/hold ribbon, iPod Photo 20GB/30GB/40GB/60GB, jog wheel, navigation wheel, center clickwheel, touch wheel, iPod Photo parts, iPod with color display, control wheel, iPod photo clickwheel replacement, 632-0258-A, wheel unresponsive, iPod 4th generation color, Folder Icon, lock symbol, Red X, won't restore.
What Owners Report
These are anecdotal owner reports, not guarantees or authoritative proof that a particular part will fix a symptom. Use them as a troubleshooting starting point: confirm the symptom, run the quick checks, then match the fix.
Click wheel or center button stops responding
Symptoms. Wheel completely unresponsive so a reset can't even be started; only the Menu position works; center button dead while play/skip/menu still work; wheel stopped clicking after a battery swelled; a center button that goes rigid on a unit that lives on a powered dock; stuck at the language screen after a factory reset with no way to move the selection. One owner after long storage: "After ~6 years in a closet the click wheel is completely unresponsive, center button included; occasionally the interface jumps on its own."
Quick diagnosis.
- Hold switch first: flip Hold on and back off and confirm it is OFF — a stuck Hold mimics a dead wheel. (One subtlety from a long-time repairer: if Hold were the culprit, the iPod wouldn't also be happily auto-playing music.)
- Reset properly: eject from the computer if connected, then Menu + Select about 10 seconds, iPod on a flat surface, one finger per button, nothing else touching the front. Repeat 4–5 times before concluding anything.
- Swollen-battery check — the one that matters most on this model. On this iPod the battery sits behind the click wheel: a Select button that suddenly goes hard on a long-docked unit is the sign of a swollen pack — replace the battery before ordering a wheel. Owners describe a pack that "characteristically swells in the center right under the center button", with the ring and the other controls unaffected. Open the case and try the wheel with the halves separated.
- Escalation triage: can you reach disk mode (Select + Play after a reset) or the diagnostic screen (Rewind + Select)? Reachability separates a wheel fault from a board or drive freeze — one repairer's frozen-interface case turned out to be the logic board.
- For a dead center button only: the button actuates a micro-switch on the logic board under it. Check that the switch still has a click feel and that the button reaches it before condemning the wheel.
Fixes.
- Clean and re-seat first — check the wheel-to-board connection is seated and free of debris; isopropyl alcohol on a cotton bud cleans the contacts. Electronic contact cleaner on the wheel's connection points is cheap and non-destructive and is worth a try on an intermittent wheel — but an intermittent wheel of this age is usually a failed assembly, and replacement is the fix that lasts.
- Click wheel replacement via the front panel — the wheel mounts to the front panel with double-sided tape and comes off with gentle leverage; it is normally replaced with or via the front-panel procedure. One repairer's removal technique on a long-stored unit: gentle heat from the panel side (a hair dryer), then a pry tool and patience — it is stubborn, and rushing bends things.
Cautions.
- Listings for both the monochrome and the color fourth-generation iPod print 632-0258-A; buy the wheel sold for the color model (A1099) and expect that number on it.
- The monochrome fourth-generation iPod (same body, gray screen) is a different platform with its own parts — see its own pages.
Community signal. Reported by 7 owners — the model's second-most-reported issue — plus three single-owner reports folded in here.