IPOD HEADPHONE JACK REPAIR
I. Fundamental Structure and Design
A. Basic Audio Jack Design
1. Standard Specifications
The iPod headphone jack utilizes the 3.5mm (1/8 inch) audio connector format, a widely recognized industry standard. This size is prevalent across all iPod models, ensuring compatibility with a vast array of standard headphones worldwide. The 3.5mm format is known for its versatility, supporting stereo audio and microphone input in more advanced configurations.
2. Contact Configurations
Early iPod models featured the TRS (Tip-Ring-Sleeve) configuration, which is a three-contact system. The tip is responsible for the left audio channel, the ring for the right audio channel, and the sleeve serves as the common ground. This setup provides stereo sound output, making it ideal for basic listening experiences.
Later iPod models adopted the TRRS (Tip-Ring-Ring-Sleeve) configuration, adding an extra ring contact. This allowed for additional functionalities such as remote control and microphone support, enhancing user interaction. The TRRS format also supports Apple-certified accessories, integrating seamlessly with Apple's ecosystem.
B. Internal Construction
1. Physical Components
The iPod's audio jack is housed within a robust metal casing, designed to withstand frequent use. Inside, spring-loaded contact pins ensure a secure connection with the headphone plug, maintaining consistent audio quality.
A detection switch mechanism is incorporated to identify when headphones are plugged in, automatically routing audio output accordingly. This feature is crucial for the device's seamless transition between speaker and headphone output.
Mounting hardware secures the jack within the iPod's chassis, preventing movement that could lead to mechanical failures.
2. Connection Methods
In some iPod models, the headphone jack is directly connected to the circuit board, providing a stable and reliable connection. This method minimizes the risk of connection issues but requires careful handling during repairs.
Other models use a ribbon or flex cable to connect the jack to the main board, allowing for more flexible internal layouts. This design is often seen in models where space optimization is critical.
The headphone jack is sometimes integrated with other components, such as the hold switch, to save space and streamline the internal design. This integration requires precision during repairs to ensure all functions work properly post-repair.
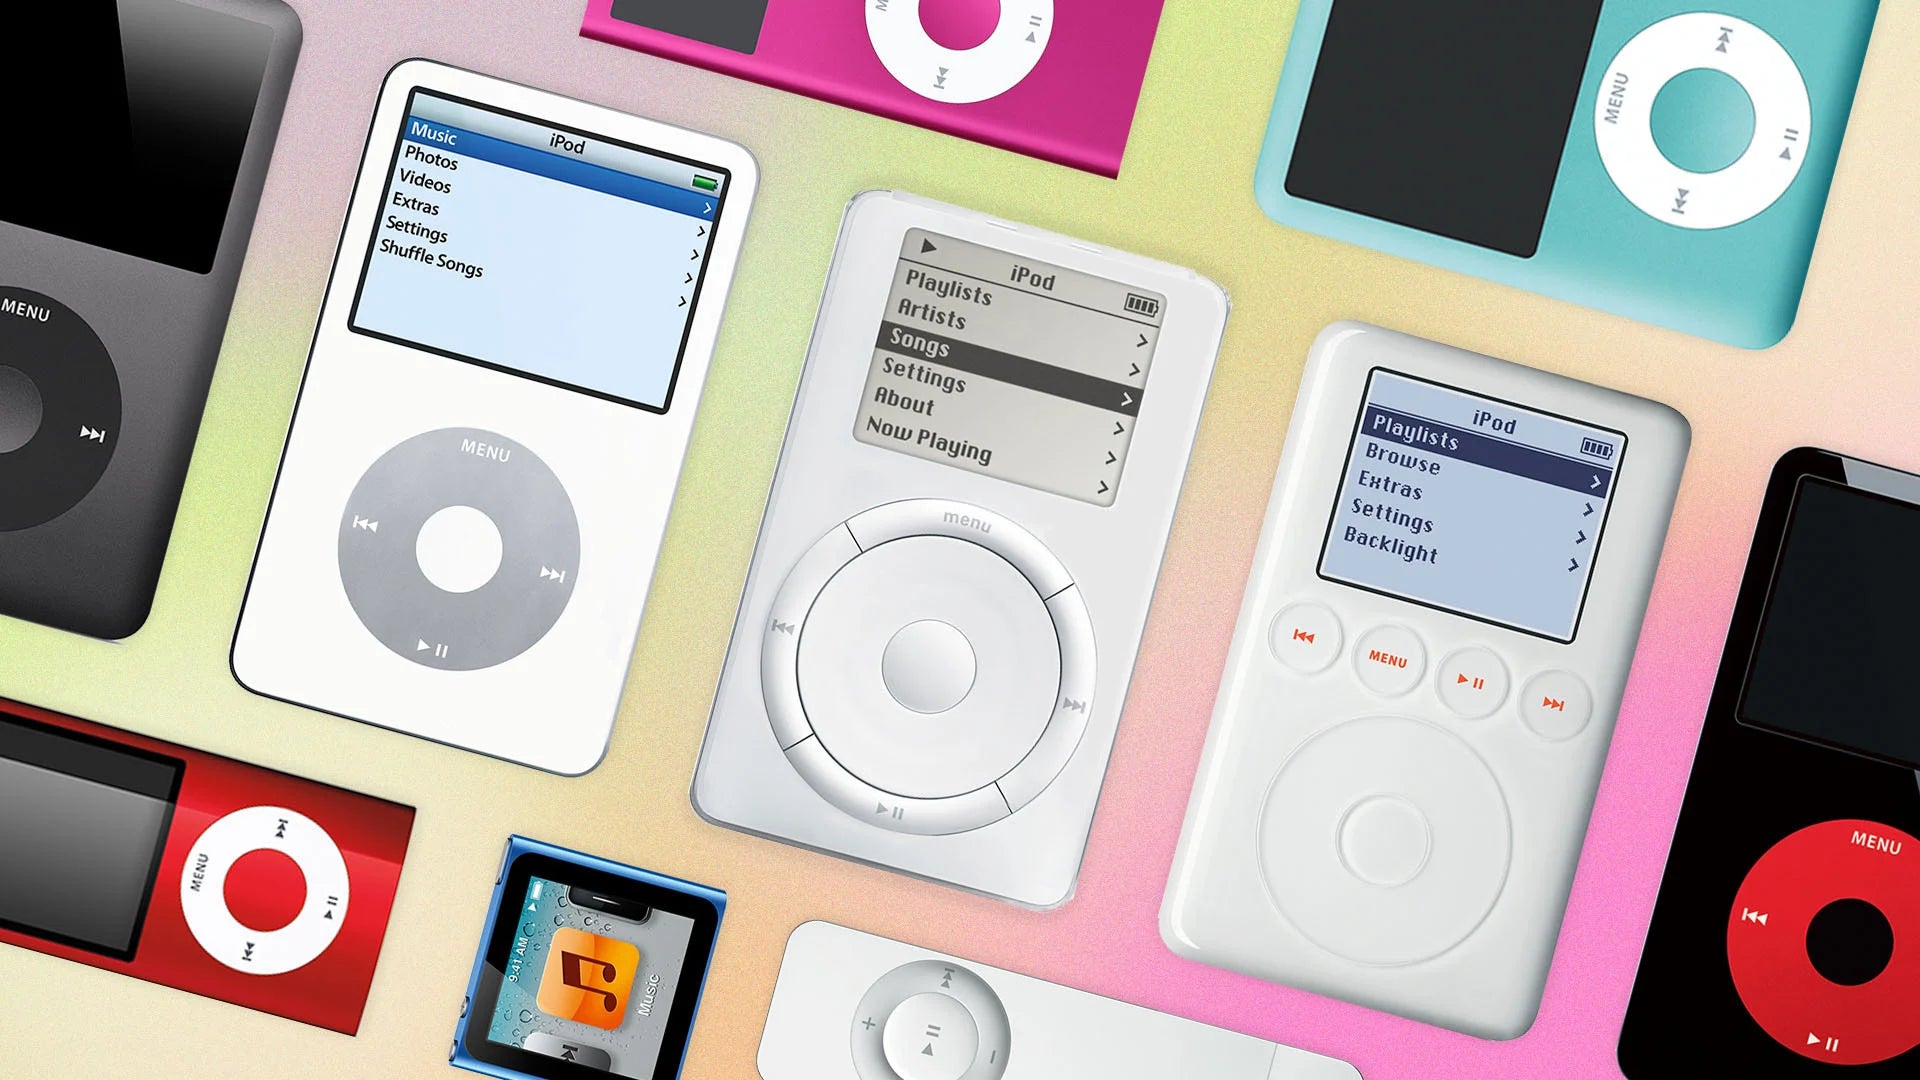
II. Evolution Across iPod Models
A. iPod Classic Jack Implementation
1. Early generations (1st-3rd)
The iPod Classic’s headphone jack was initially positioned at the top-center of the device, close to the FireWire port, which was a common connection interface for early iPods. This strategic placement facilitated easy access and ensured a streamlined design. During these generations, the headphone jack was an independent component, not integrated with other features like the hold switch, which allowed for straightforward repairs and replacements if needed.
2. Middle generations (4th-5th including iPod Video)
As the iPod Classic evolved into its middle generations, the headphone jack maintained its top placement, reinforcing user familiarity and convenience. However, during these iterations, the jack was integrated into the hold switch assembly, a design shift that aimed to conserve space and enhance the device’s compactness. The connection to the main board was facilitated by a ribbon cable, which allowed for a more flexible internal configuration and contributed to the device’s slimmer profile. Common issues with the ipod classic headphone jack included failures that required detailed instructions for replacing the headphone jack and hold switch.
3. Late generations (6th-7th)
In the later generations of the iPod Classic, the headphone jack design remained consistent with minor refinements to improve durability and user experience. It continued to be a part of the hold switch assembly, ensuring a cohesive internal design. Accessing the headphone jack required opening the device case, a task that called for precision and care to avoid damage to the surrounding components.
B. iPod Nano Jack Evolution
1. Placement changes across generations
The iPod Nano's headphone jack placement varied significantly across its seven generations. Initially, in the 1st and 2nd generations, the jack was located at the bottom of the device, a choice that supported the device's slim profile. The 3rd generation saw a shift to the bottom-left corner, a design that accommodated the Nano's wider form factor. By the 4th and 5th generations, the jack was centered at the bottom, balancing the device's symmetry and user handling. The 6th generation's square design moved the jack to the top, reflecting the device's compact and clip-friendly build. Finally, the 7th generation returned to a bottom placement on a rectangular design, aligning with the device's streamlined aesthetics.
2. Design adaptations
Throughout its evolution, the iPod Nano underwent significant design adaptations to accommodate its shrinking size and increasing functionality. The headphone jack implementations became progressively smaller, integrating with the Nano's increasingly compact designs. This evolution required innovative mounting variations to fit different case designs, ensuring that the jack maintained its functionality without compromising the device's sleek appearance.
C. iPod Shuffle Jack Designs
1. Standard implementations
The iPod Shuffle, known for its minimalist and portable design, featured a standard headphone jack on its body in the 1st generation. This straightforward design was top-mounted in the 2nd generation, aligning with the Shuffle's compact, clip-on form.
2. Dual-purpose jack (3rd-4th generations)
The 3rd and 4th generations of the iPod Shuffle introduced a dual-purpose headphone jack, a significant innovation that allowed the jack to serve both as an audio output and a data transfer and charging port via a special adapter. This design required a proprietary headphone adapter for some functions, emphasizing Apple's focus on maintaining a compact design while enhancing the Shuffle's versatility.
D. iPod Touch Jack Implementation
1. Consistent bottom placement
Across all its generations, the iPod Touch maintained a consistent bottom placement for the headphone jack, a design choice that facilitated easy access and complemented the device's overall layout. This placement was integrated with other bottom-mounted components, ensuring a seamless design and user experience.
2. Design consistency
The iPod Touch adhered to the 3.5mm standard throughout its lifecycle, even as contemporary iPhones began to phase out the headphone jack. This consistency provided users with a reliable audio connection and ensured compatibility with a wide range of headphones, reinforcing the iPod Touch's reputation as a versatile multimedia device.
III. Common Problems and Failure Modes
A. Electrical Connection Failures
1. Complete audio loss
One of the most frustrating issues iPod users encounter is the complete absence of sound through the headphones. This problem often arises when the device fails to detect the headphones, resulting in no audio output. The issue is not limited to a single pair of headphones but affects all connected pairs, indicating a deeper problem with the audio jack or internal connections.
2. Channel-specific failures
Another common problem is sound playing in only one ear, whether it's the left or right channel. This failure is consistent across different headphones, suggesting a fault within the iPod's headphone jack rather than the headphones themselves. This issue often starts subtly but can progressively worsen over time, leading to a complete loss of audio in one channel.
3. Intermittent connectivity
Users may experience audio that cuts in and out, a problem often linked to intermittent connectivity. This issue is typically position-dependent, meaning the audio connection is stable only when the headphones are held at a specific angle. Such movement-sensitive audio problems can make listening experiences frustrating and are usually indicative of a loose or damaged connection within the jack.
B. Mechanical Failures
1. Detection switch issues
Mechanical failures often manifest as detection switch problems, where the iPod doesn't recognize that headphones are connected. This can lead to audio being incorrectly routed to the device's speaker even when headphones are plugged in. Sometimes, the headphones must be positioned precisely for the device to function correctly, pointing to a faulty detection switch mechanism.
2. Physical damage
Physical damage to the headphone jack is another prevalent issue. This can include a loose jack housing, which causes excessive play when headphones are connected, or visible damage to the jack opening. Bent or broken internal components can exacerbate these problems, often requiring professional repair or replacement to restore functionality.
C. Audio Quality Problems
1. Noise and interference
Audio quality issues such as static during playback, crackling noises, or a background hum or buzz can significantly diminish the listening experience. These problems often stem from poor connections within the jack or interference from other components, necessitating careful examination and repair.
2. Distortion issues
Distortion of sound quality, including degradation or bass frequency distortion, is another common complaint. These issues can be volume-dependent, meaning they become more pronounced at higher volumes. Identifying the root cause of such distortion is crucial for effective repair.
3. Movement-related audio issues
Audio issues that are affected by specific movements, such as sound quality deteriorating when the device is moved, are often linked to faulty connections within the headphone jack. Position-sensitive audio quality problems can worsen over time, highlighting the need for timely intervention to prevent further damage.
IV. Diagnostic Approaches
A. Systematic Testing
1. Headphone Isolation Testing
One of the first steps in diagnosing an iPod headphone jack issue is to isolate the problem by using multiple pairs of known-good headphones. This process helps determine if the issue lies with the headphones or the iPod itself. If the problem persists across different headphones, it indicates a potential issue with the iPod’s audio jack.
Additionally, testing the problematic headphones on other devices can help identify whether the headphones themselves are faulty. If they function correctly on other devices, the issue likely resides within the iPod’s headphone jack.
Carefully evaluate differences in behavior across various headphones and devices. This comparison can provide insights into whether the problem is consistent or intermittent, aiding in pinpointing the exact nature of the fault.
After repairs, it is crucial to confirm that the headphone jack is working properly through systematic testing. This ensures that all components are functioning correctly and provides reassurance about the quality of the repair.
2. Movement and Position Testing
Testing different insertion angles of the headphone plug can reveal issues related to the connection stability within the jack. If audio quality improves or worsens based on the angle or depth of insertion, it suggests a loose or damaged internal connection.
Apply gentle pressure on the headphone plug while inserted to evaluate the effects on audio output. If sound quality changes or becomes more stable with pressure, it indicates a potential mechanical issue within the jack.
Observe connection stability during movement. If audio cuts in and out when the device is moved, it is likely due to intermittent connectivity caused by wear or damage to the jack’s internal components.
3. Software Elimination
Resetting the iPod can help eliminate software-related issues that might affect audio output. A reset can clear temporary glitches that may be causing the jack to malfunction.
Testing with different audio files ensures that the problem is not file-specific. Corrupted or incompatible audio files can sometimes cause playback issues, so using various files can help confirm the jack’s functionality.
Verify volume and EQ settings to ensure they are not affecting audio output. Incorrect settings can sometimes mimic hardware problems, so checking these settings can help rule out simple user error.
B. Problem Classification
1. Determining Repair Needs
Distinguishing between cleaning and replacement is crucial for effective repair. If the issue is caused by dirt or debris, cleaning with compressed air or isopropyl alcohol may resolve the problem. However, if the jack is physically damaged, replacement is likely necessary.
Analyzing whether the failure was progressive or sudden can provide clues about the underlying cause. Progressive failures often result from wear and tear, while sudden failures may indicate physical damage or internal component failure.
Conducting a cost-benefit assessment helps decide whether to repair or replace the device. Consider the age of the iPod, the cost of replacement parts, and the potential for future issues when making this decision. In some cases, investing in a new device might be more cost-effective than repairing an old one.
V. iPod Headphone Jack Repair and Replacement Options
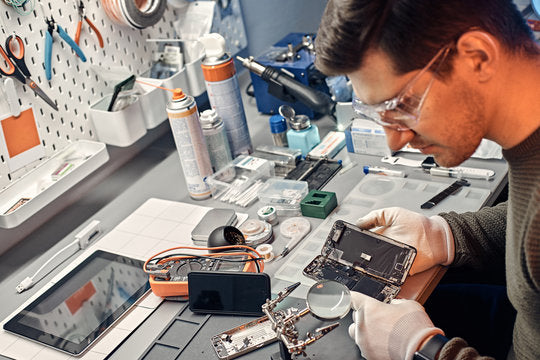
A. DIY Repair Approaches
1. Cleaning Procedures
Compressed Air for Debris Removal: The initial step to address iPod headphone jack issues often involves cleaning. Using compressed air can effectively dislodge dust and debris that accumulate in the audio jack over time. It is crucial to hold the can upright and use short bursts to avoid moisture from entering the jack, which could cause further damage.
Isopropyl Alcohol Cleaning Techniques: For more stubborn grime, using a high-concentration isopropyl alcohol is recommended. Dampen a cotton swab with the alcohol and gently clean the inside of the jack. This method helps in removing oils and residues that may interfere with the connection. Ensure the device is powered off before cleaning to prevent short circuits.
Drying Requirements: After cleaning, allow the jack to dry completely before testing it with headphones. This prevents any residual moisture from affecting the audio quality or causing electrical issues. Using a lint-free cloth can help in absorbing any excess alcohol.
2. Jack Replacement by Model Type
iPod Classic: Replacing the headphone jack in an iPod Classic involves opening the rear panel, which requires specialized tools to avoid damaging the casing. The jack is typically connected via a ribbon cable to the main board, necessitating careful handling during removal and installation.
iPod Nano: Each generation of the iPod Nano may require a unique approach due to design variations. For instance, the jack's position and integration with other components like the hold switch can differ, requiring model-specific disassembly techniques.
iPod Touch: The iPod Touch requires screen removal to access the headphone jack, which is mounted on the device's bottom. This process involves careful prying and unscrewing, as the screen is delicate and prone to damage.
iPod Shuffle: Due to its compact design, the iPod Shuffle offers limited repair options. In many cases, the headphone jack is soldered directly to the board, making replacement a complex task that might not be feasible for all users.
B. Replacement Parts
1. Part Specifications
Model-Specific Requirements: Replacement parts must match the specific model of the iPod to ensure compatibility. Differences in size, connector type, and integrated components like the hold switch or volume controls necessitate precise part selection.
Integrated Components: Some headphone jacks are integrated with other functions, such as the hold switch. When replacing these, it's essential to verify that the new part supports all necessary functionalities.
Connection Type Variations: Depending on the model, the connection to the main board may be via a ribbon cable or direct soldering. Understanding these variations is critical for a successful repair.
2. Quality Considerations
Aftermarket vs. Original Parts: While aftermarket parts can be cost-effective, they may lack the durability and fit of original Apple components. It's important to weigh the benefits of cost savings against potential quality issues.
Compatibility Verification: Ensuring that replacement parts are compatible with the specific iPod model is crucial. Mismatched parts can lead to further damage or operational failures.
Cost Range Expectations: Replacement parts can vary significantly in price. Original parts tend to be more expensive but offer assurance of quality and compatibility. Aftermarket options may be cheaper but come with varying reliability.
C. Professional Repair
1. Service Options
Specialized iPod Repair Services: Many repair shops specialize in iPod repairs and offer expertise in handling delicate components like the headphone jack. These services often provide warranties on their work, offering peace of mind.
Electronics Repair Shops: General electronics repair shops can also handle iPod headphone jack issues, though they may not have the same level of specialization as dedicated iPod repair services.
Mail-in Repair Services: For those without access to local repair shops, mail-in services are a convenient option. These services allow users to send their devices to a centralized location for repair, though they may involve longer wait times.
Apple Store Experiences: Users have reported seeking repair services at the Apple store and local Apple store for malfunctioning iPod headphone jacks. However, many express frustration over the lack of assistance received, indicating that the support may not meet customers' expectations for repairs.
2. Cost Considerations
Typical Price Range ($30-80): The cost for professional repair of an iPod headphone jack typically falls within this range, depending on the model and extent of the repair needed.
Model-Dependent Cost Variations: Some models, due to their complexity or the rarity of parts, may incur higher repair costs. It’s important to consider the value of the device when deciding on repairs.
Cost-Benefit Compared to Device Value: Evaluating whether the repair cost is justified compared to the device’s current value is essential. In some cases, investing in a new device may be more economical than repairing an old one.
VI. Tools and Skills Required
A. Basic Repair Equipment
1. Opening and Disassembly Tools
iPod Opening Tools Specific to Model: Each iPod model may require unique tools for safe disassembly. Specialized opening tools, often included in repair kits, are designed to prevent damage to the device's casing. These tools are critical for accessing internal components without scratching or cracking the exterior.
Small Screwdrivers (Phillips and Torx): Precision screwdrivers are essential for removing the small screws that secure the iPod's internal components. Phillips and Torx screwdrivers are commonly used, as these types of screws are prevalent in iPod assemblies. Ensuring the correct size prevents stripping the screws and facilitates smooth disassembly.
Spudgers and Pry Tools: Spudgers and pry tools are used to gently separate components and connectors. These tools are typically made of plastic or nylon to avoid damaging delicate parts. They help in safely lifting connectors and opening the device's casing without exerting excessive force.
2. Cleaning Supplies
Compressed Air: Compressed air is used to blow out dust and debris from the headphone jack and other internal components. It is an effective way to maintain cleanliness without direct contact, reducing the risk of damaging sensitive parts.
High-Concentration Isopropyl Alcohol: Used for cleaning the headphone jack and other areas prone to grime buildup. A concentration of 90% or higher is recommended for effective cleaning without leaving residue. Alcohol evaporates quickly, minimizing the risk of moisture damage.
Cotton Swabs: Cotton swabs are ideal for applying isopropyl alcohol to specific areas. They allow for precise cleaning of the headphone jack and other small components. It is important to use them gently to avoid leaving fibers behind.
Lint-Free Cloths: Lint-free cloths are used for drying and wiping down components after cleaning. They help prevent static buildup and ensure that no lint or fibers are left on the device's surface.
B. Skill Requirements
1. Disassembly Competency
Model-Specific Opening Techniques: Each iPod model may have unique disassembly procedures. Familiarity with these techniques is crucial to avoid damaging the device. Following step-by-step guides and watching tutorials can be beneficial.
Component Organization: Keeping track of small parts and screws during disassembly is essential. Using labeled containers or magnetic mats can help organize components and ensure they are reassembled correctly.
Connector Handling: Careful handling of connectors is vital to prevent damage. Understanding how to safely disconnect and reconnect these components is a key skill in iPod repair. Gentle prying and lifting techniques should be employed to avoid breaking fragile connectors.
2. Careful Reassembly
Proper Component Positioning: Ensuring that all components are correctly aligned and seated during reassembly is critical for the device's functionality. Misalignment can lead to mechanical failures or poor connections.
Connector Reattachment: Reconnecting internal cables and connectors must be done with precision to ensure a secure fit. Loose connections can cause intermittent audio issues or complete device failure.
Case Closure Techniques: Properly closing the iPod's casing is the final step in the repair process. Ensuring that all clips and screws are securely fastened will prevent the device from opening unexpectedly and protect the internal components from damage.
VII. Maintenance and Prevention
A. Preventative Care
1. Proper Usage Habits
Correct Insertion and Removal Technique: To maintain the longevity of your iPod's headphone jack, it's crucial to insert and remove the headphone plug carefully. Align the plug properly with the jack and avoid forcing it in at an angle. This prevents damage to the internal contacts and ensures a secure connection every time.
Handling While Headphones Are Connected: Avoid carrying or moving the iPod by the headphone cable, as this can strain the jack and lead to loosening or damage over time. Instead, hold the device itself, ensuring that the cable remains untangled and free from unnecessary tension.
Storage Recommendations: When not in use, store your iPod in a protective case to shield it from dust and physical damage. Ensure that the headphone jack is free of debris by occasionally using dust plugs, especially when storing the device for extended periods.
2. Regular Maintenance
Periodic Inspection: Regularly check the headphone jack for any visible signs of wear or damage. Inspect the plug and cable for fraying or bending, which can indicate potential issues with the audio connection.
Gentle Cleaning: Clean the headphone jack periodically using compressed air to remove any dust or debris. For more thorough cleaning, use a cotton swab lightly dampened with isopropyl alcohol, but ensure the device is powered off during this process to prevent short circuits.
Early Intervention for Minor Issues: Address minor issues such as static or intermittent sound promptly to prevent them from escalating into more significant problems. If you notice any irregularities, consider consulting a professional or using DIY repair methods to resolve the issue early.
B. Signs of Developing Problems
1. Early Warning Indicators
Subtle Static or Noise: Pay attention to any unusual sounds like static or crackling when using headphones. These noises can be a precursor to more severe connectivity issues within the headphone jack.
Positioning Requirements for Clear Audio: If you notice that audio quality improves or deteriorates depending on the position of the headphone plug, it may indicate a loose connection or wear within the jack that needs addressing.
Connection Looseness: A noticeable looseness when inserting the headphone plug can signal that the jack's internal components are wearing out. This can lead to intermittent audio or complete sound loss if not repaired.
Intermittent Detection Issues: If your iPod occasionally fails to recognize when headphones are connected, resulting in audio playing through the device's speaker instead, it may suggest a faulty detection switch or internal connection problem that warrants investigation.
VIII. Special Situations
A. Broken Plug Extraction
1. Assessment Approach
Determine Accessible Portion: When dealing with a broken headphone plug lodged in the iPod's jack, the first step is to assess how much of the plug is accessible. This involves carefully examining the jack opening to see if any part of the plug is visible or protruding. The visible portion will dictate the potential methods for extraction and the tools that might be required.
Evaluate Extraction Difficulty: Consider the complexity of the extraction based on the plug's position and the iPod model. If the plug is deeply embedded or if the jack's design complicates access, the extraction process may be more challenging. This evaluation helps in deciding whether a DIY approach is feasible or if professional help is needed.
2. Removal Techniques
Adhesive-Based Methods: One common DIY technique involves using a strong adhesive, such as super glue, to extract the broken plug. Apply a small amount of glue to the end of a thin object like a toothpick or matchstick, carefully insert it into the jack to make contact with the broken plug, and allow the glue to set. Once bonded, gently pull the object out, ideally bringing the broken plug with it. This method requires precision to avoid damaging the internal components of the jack.
Tool-Based Extraction: For cases where adhesive methods are inadequate, specialized tools can be employed. Needle-nose pliers or tweezers can be used if the broken piece is accessible. Alternatively, a broken headphone plug extractor tool, available at electronics stores, may be used. These tools are designed to grip the plug securely for removal without causing damage to the jack.
Professional Service When Necessary: If DIY methods fail or if the risk of damaging the iPod is high, seeking professional repair services is advisable. Technicians have the expertise and specialized equipment to safely extract broken plugs without compromising the device's functionality.
B. Liquid Damage Response
1. Immediate Actions
Power Off Device: As soon as liquid exposure is detected, immediately power off the iPod to prevent short circuits and further damage. Do not attempt to turn it on or charge it until it has been thoroughly dried and assessed.
Drying Procedures: Begin by gently shaking the device to remove excess liquid. Use a lint-free cloth to wipe down the exterior. Place the iPod in a well-ventilated area or use a fan to aid in drying. Avoid using heat sources like hairdryers, as excessive heat can damage internal components.
Assessment Timeline: Allow the device to dry for at least 24 to 48 hours before attempting to power it on. This ensures that any residual moisture has evaporated, reducing the risk of electrical damage.
2. Post-Exposure Care
Cleaning Techniques: Once the device is dry, inspect the headphone jack and other ports for any signs of corrosion or residue. Use a cotton swab lightly dampened with isopropyl alcohol to clean the jack, ensuring the device is powered off during this process to avoid short circuits.
Testing Protocol: After cleaning, power on the device and test the functionality of the headphone jack with a pair of known-good headphones. Check for audio quality issues, intermittent connectivity, or detection failures that may indicate lingering damage.
Professional Intervention Indicators: If the headphone jack or other components continue to malfunction after drying and cleaning, it may be necessary to consult a professional repair service. Persistent issues like distorted audio, detection failures, or non-responsive controls could signify deeper damage requiring expert assessment and repair.
IX. Historical Context
A. Design Evolution
1. Consistent 3.5mm Standard
Throughout the iPod's product lifecycle, the 3.5mm audio jack remained a consistent feature, underscoring its importance in providing a universal audio connection. This standardization ensured compatibility with a wide variety of headphones and audio accessories, making it a staple in consumer electronics. While other ports, such as the 30-pin connector and later the Lightning port, evolved to accommodate new functionalities and slimmer designs, the 3.5mm jack stood firm, valued for its reliability and broad compatibility.
The decision to maintain the 3.5mm standard, even as other technologies advanced, speaks to its effectiveness in delivering high-quality stereo audio. This consistency allowed users to rely on the same headphones across multiple iPod models, contributing to the device's user-friendly reputation.
2. Integration Changes
In the early iPod models, the headphone jack was a standalone component, separate from other functionalities. This simplicity facilitated easy repairs and replacements, as the jack could be accessed and serviced independently from the rest of the device.
As iPod designs evolved, the headphone jack became integrated with other components, such as the hold switch or volume controls. This integration was part of Apple's strategy to streamline the device's internal layout, making it more compact and efficient. The integration also reflected advancements in technology that allowed for multifunctional components, saving space while enhancing the device's capabilities.
Later generations of the iPod saw enhancements in durability, as the headphone jack was reinforced to withstand frequent use. This included improvements in the materials used and the design of the internal contacts, ensuring a longer lifespan and reducing the likelihood of mechanical failures.
B. Relationship to Other Components
1. Physical Proximity
The headphone jack's integration with the hold switch in some iPod models was a strategic design choice that optimized space and functionality. By combining these components, Apple was able to maintain the iPod's sleek profile while providing users with essential controls in a convenient location.
In certain models, the headphone jack was positioned in close proximity to the power button. This layout facilitated ease of access, allowing users to control audio playback and power the device on or off without having to adjust their grip or reach across the device.
The headphone jack's relationship to the main board was crucial for maintaining a stable connection. Whether connected via a ribbon cable or directly soldered, this connection ensured that audio signals were transmitted efficiently, contributing to the device's overall performance.
2. Signal Path Connection
The headphone jack's connection to the audio processing circuitry was fundamental to its function, ensuring that sound quality was maintained from the device to the headphones. This connection involved a precise arrangement of contacts and pathways that allowed for clear and uninterrupted audio playback.
The volume control relationship was another key aspect of the headphone jack's design. By integrating volume control functionalities, users could easily adjust audio levels directly from their headphones, enhancing the listening experience and providing greater control over sound output.
Interaction with the amplification circuit was essential for delivering the necessary power to drive headphones. This interaction ensured that audio signals were amplified to the appropriate levels, delivering rich and dynamic sound quality that met users' expectations for portable audio devices.
X. Legacy and Collector Considerations
A. Preservation Importance
1. Functionality Impact
Critical for Device Usability: The headphone jack remains a vital component of the iPod, providing the primary means of audio output. Its functionality is crucial for users who prefer wired headphones for their reliability and sound quality. Ensuring the headphone jack is in working condition is essential for the usability of the device, as it directly affects the listening experience.
Primary Audio Output Method: For many iPod models, especially the earlier generations, the headphone jack is the primary method for audio output. This makes its maintenance and preservation a priority for those who continue to use their iPods for music playback. A faulty jack can render the device nearly unusable for its intended purpose.
Essential for Collector Value: Collectors place a high value on iPods with functional headphone jacks. As a key component, its condition can significantly influence the device's market value. Collectors often seek iPods that are in original and working condition, as these are considered more desirable and valuable.
2. Original Condition Value
Working Condition Premium: iPods that retain their original working components, including the headphone jack, often command a premium in the collector's market. Devices that are fully functional and have not undergone extensive repairs are more sought after, as they offer an authentic experience of the iPod's original performance.
Original Parts Preference: Collectors typically prefer iPods with original parts, as these maintain the device's authenticity and historical accuracy. Replacing parts with non-original components can decrease the value, as it detracts from the device's originality and may affect its performance.
Documentation of Repairs: For collectors, having a documented history of any repairs or replacements can enhance the iPod's value. Detailed records that outline what repairs were made, when, and with what parts can provide assurance of the device's condition and integrity. This transparency is appreciated in the collector community, as it helps maintain the iPod's provenance.
B. Long-term Storage
1. Protection Methods
Dust Plugs During Storage: Using dust plugs to cover the headphone jack during storage can prevent the accumulation of debris and dust, which can impair functionality. These plugs are an inexpensive yet effective way to protect the internal components from potential damage.
Position to Prevent Pressure on Jack: When storing an iPod, it is important to position the device in a way that avoids exerting pressure on the headphone jack. Excessive pressure can lead to mechanical failures or deformation of the jack, compromising its functionality over time.
Climate Considerations: Proper climate control is crucial when storing iPods long-term. Extreme temperatures and humidity can adversely affect the device's electronic components, including the headphone jack. Storing the iPod in a cool, dry place helps preserve its condition and prevents moisture-related damage, which is particularly important for maintaining the integrity of the audio jack and other sensitive parts.