Product Overview
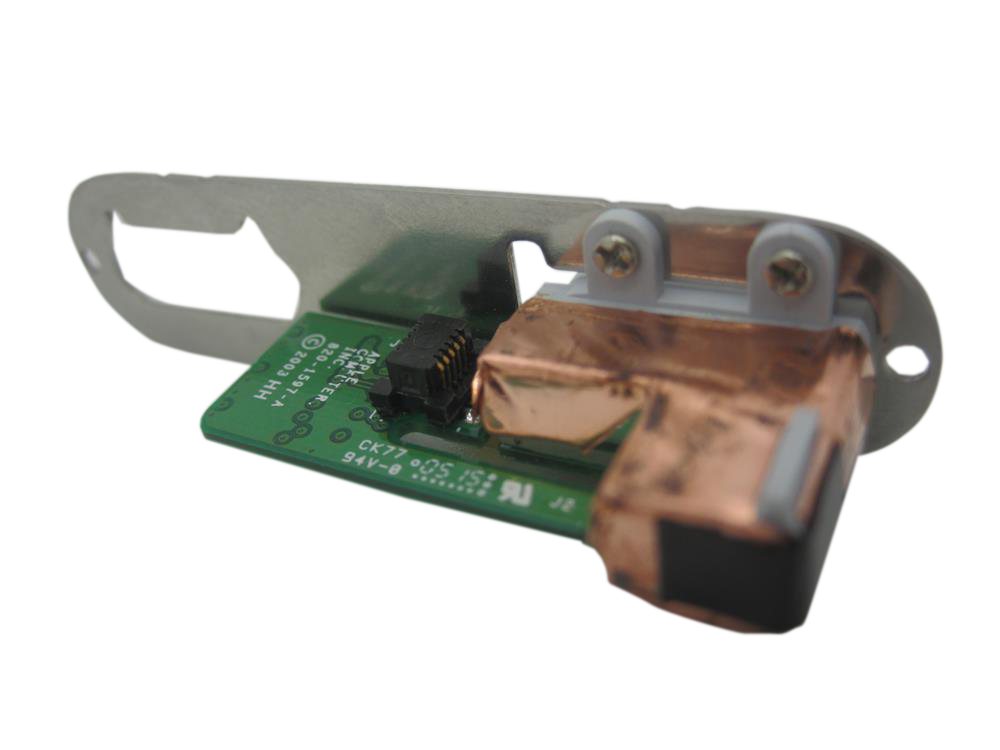
This headphone jack listing covers Headphone Jack / Hold Switch Assembly and its own connector path on the iPod Mini 1st Generation.
Use Part Details for the confirmed part-number reference. Use the Compatible Variants table below to confirm capacity, color, or order-number fitment.
Choose this part when your iPod shows No Sound or Headphone Jack Not Working; the checks below help confirm the right part before you order.
What Is Included
Condition: Used factory-original part. Quantity and exclusions: The listed part, set, pair, or configuration above is supplied with exactly one plastic pry tool. No other parts, tools, adhesives, or materials are included unless they are explicitly listed above.
Quick Buying Check
Buy this when
- No Sound: Use the headphone/Hold check when headphone output or Hold-switch behavior is isolated from dock audio, board audio, and connector seating.
Diagnose first when
- Confirm the capacity match before ordering: 4GB.
- Try the simple power, cable, connector, or reset checks before ordering.
- If the problem started immediately after opening the iPod, inspect the parts that were disturbed first.
Do not buy for
- Do not use this part for: Full-size hard-drive iPods use a different headphone jack assembly.
- One-ear audio often points to the jack, but both dock and headphone audio failing together can point to the logic board.
- Hold-switch symptoms may be the shared headphone/hold assembly rather than the click wheel.
Specifications & Fitment
Part Details
| Detail | Value |
|---|---|
| Model Number | A1051 |
| EMC | EMC 1984 |
| Condition | Used — factory original Apple part. Normal cosmetic wear expected. |
| Part Identifiers | 820-1597-A |
| Jack Size | 3.5mm |
| Includes Hold Switch | Yes |
| Design | Press-fit |
Compatible Variants
| Order Number | Capacity | Color | Case | Compatible | Notes |
|---|---|---|---|---|---|
| M9436LL/A | 4GB | Blue | — | Yes | — |
| M9437LL/A | 4GB | Gold | — | Yes | — |
| M9434LL/A | 4GB | Green | — | Yes | — |
| M9435LL/A | 4GB | Pink | — | Yes | — |
| M9160LL/A | 4GB | Silver | — | Yes | — |
Diagnostic Failure Cards
Use these model-specific failure cards to decide whether this headphone jack assembly is the right part, a nearby part needs checking first, or escalation makes more sense after simpler checks.
| Symptom | What it means & what to check |
|---|---|
| Symptom remains after basic checks |
What you may see: The iPod still points back to Headphone Jack / Hold Switch Assembly after cable seating, battery stability, and nearby connector checks. Check first: Retest with known-good cables or adjacent parts where practical before ordering. Check next: A nearby cable, connector, battery, storage device, display path, audio path, or board path can mimic a bad headphone jack assembly. |
| Symptom changes when touched or reseated |
What you may see: The symptom changes after moving the part, reseating a cable, or applying light pressure near the connector path. Check first: Inspect the connector, latch, flex, solder joints, and nearby board area for damage or corrosion. Check next: This can still be a connection issue rather than a failed headphone jack assembly alone. |
| Problem began after another repair |
What you may see: The issue started immediately after opening the iPod, replacing another part, or disturbing an internal cable. Check first: Reopen only as far as needed and inspect the exact area touched during the previous repair. Check next: Post-repair symptoms often trace to seating, latch, screw, or cable issues before Headphone Jack / Hold Switch Assembly itself is confirmed bad. |
| Hold switch is stuck, locked, or not reporting correctly |
What you may notice
Diagnose first when
Similar issues to separate
Where this headphone jack assembly does not fit
Check another part first
|
| Dock output and headphone output behave differently |
What you may notice
Diagnose first when
Similar issues to separate
Check another part first
Repair or replacement paths
Cautions
|
| Liquid, corrosion, or residue context |
What you may notice
Diagnose first when
Similar issues to separate
Check another part first
Repair or replacement paths |
| No sound or missing headphone audio |
What you may notice
Diagnose first when
Similar issues to separate
Repair or replacement paths
|
| Ribbon, storage connector, or ground-path checks |
What you may notice
Similar issues to separate
|
| Symptoms changed after repair or reassembly |
What you may notice
Similar issues to separate
|
| Match the headphone/hold assembly to your exact iPod Mini 1st Generation before ordering |
What you may notice
Diagnose first when
Similar issues to separate
Check another part first
Repair or replacement paths
|
| Fitment and inspection notes |
Do Not Buy / Problems This Headphone Jack Assembly Does Not Fix
| Situation | Start here instead |
|---|---|
| Headphone and dock or line-out audio are both silent | Start with the logic board or audio-circuit check; a headphone-only failure is a reason to buy this assembly, not avoid it. |
| The fault is clearly the storage, battery, or logic board — not the jack or Hold switch | Start with the hard drive, battery, or logic-board check for your model before buying this assembly. |
| A symptom points to a different part | Start with battery for power/runtime symptoms; hard-drive cable for folder, clicking, or restore symptoms; dock-port bracket for dock, sync, or charge-port symptoms; click wheel for click-wheel or control symptoms; logic board for board-side damage or multi-system symptoms before buying this part. |
| Variant or capacity does not match this listing | Compare known-good headphones, Hold behavior, dock or line-out audio, and the headphone/Hold ribbon first. |
Install Overview
Before You Start
Turn Hold off, use the reset sequence for this generation, and confirm the model and variant before opening the iPod.
Treat case opening as the highest handling risk. Work around the seams gently and stop if the shell, clips, or internal stack resist.
Do not pull the halves apart or side-load board sockets. Reseat nearby ribbons and connectors before blaming a replacement headphone jack assembly.
Repair steps
Documented repair-procedure steps for replacing the headphone jack assembly on this model (from teardown guides; confirm against your unit before starting):
- Use a spudger to carefully pry up the headphone jack board from the logic board. Be careful to pry up near the connector to prevent unnecessary strain on the board.
- [NOTE] Do not pull on the headphone jack board at the top of the iPod, as the connector to the logic board is fragile.
Disassembly Guide
Disassembly guide summary: iPod Mini Headphone Jack Board Replacement.
Show all 12 installation steps
Confirm that the hold switch is locked before you open the iPod.
Carefully slide a small flathead screwdriver or Jimmy into the seam between the metal casing and white plastic top. Lever up the white top bezel, taking care not to damage the soft plastic. The top bezel is adhesive-backed, so you may need to lever it up from several spots before it releases. Heat up the adhesive for a few seconds with a hair dryer on low heat to make the job easier.
Raise the top bezel off the iPod.
Carefully slide a small flathead screwdriver or Jimmy into the seam between the metal casing and white plastic bottom. Lever up the white bottom bezel, taking care not to damage the soft plastic.
A small pair of snap-ring pliers is the best tool to take out the metal retaining bracket. You can also lever out the metal retaining bracket beneath the bottom bezel with a flathead screwdriver. Release the bracket by pressing in the corner metal arms first.
Lift the released bracket away and set it aside.
With a spudger or fingertip, carefully disconnect the orange click wheel ribbon from the logic board.
Take out the 2 #00 Phillips screws securing the headphone jack to the casing.
Carefully move the iPod out of its casing by pressing on the logic board near the click wheel's bottom edge. Do not tug on the headphone jack board at the iPod top; its logic board connector is fragile.
After the logic board has been pushed out far enough, gently grip it on either side of the display and keep sliding the iPod from its casing.
Raise the battery off the logic board and set it to the side of the iPod.
With a spudger, carefully lever up the headphone jack board from the logic board. Be cautious to lever up near the connector to prevent unnecessary strain on the board. Raise the headphone jack board off of the logic board.
Product-specific placement, reassembly, and check
- Prepare and access. Confirm the exact model and listing fit first. Use the existing steps as a disassembly guide, gather the specified tools, disconnect power where applicable, and keep screws and cable positions organized.
- Place Headphone Jack / Hold Switch Assembly. Align the jack and Hold-switch assembly with the housing openings and seat its cable without twisting or trapping it.
- Reassemble without force. Reverse only the access steps needed for this repair, keep cables clear of case edges and screw posts, and close clips in stages.
- Validate before final closure. Before final closure, test left/right audio, plug detection, and the Hold switch while the assembly remains accessible.
Stop condition: Stop if a connector, latch, screw, clip, housing edge, or the replacement part resists normal alignment. Recheck model fit, orientation, cable routing, and trapped hardware instead of forcing it.
After This Repair
| Check | What to do |
|---|---|
| Test audio and Hold | Use known-good headphones and check both channels, static, plug movement, and Hold-switch behavior. |
| Still not working? | Compare headphone output with dock or line-out behavior when the model supports it, then inspect ribbon seating. |
Worth Knowing
Frequently Asked Questions
Use these questions to narrow the part path before ordering. They keep each answer focused on a different diagnostic or fitment decision.
How do I choose the right headphone jack assembly?
Match capacity 4GB and confirm whether the Hold switch shares the same assembly on this model before ordering.
Can one-channel audio be because of something else?
Yes. Check headphones, the jack opening, debris, pressure on the case, ribbon seating, and board-side damage before treating the jack assembly as the only cause.
Can the Hold switch be part of the headphone-jack assembly?
Move the Hold switch and watch whether the lock indicator changes. Inspect the headphone/hold ribbon if the symptom started after opening the iPod. Choose this assembly only when Hold switch behavior is the failing path. Check click-wheel input only after the Hold path is ruled out.
Is this for a full-size hard-drive iPod?
The iPod mini is a separate Apple product line from full-size hard-drive iPods. This is the iPod mini 1st Generation.
Does capacity matter for this part?
Use the Specifications & Fitment table as the source of truth. Match model, capacity, connector style, and order-number family before ordering.
Why people land on this part
Also searched as: iPod mini 1st Generation Headphone Jack / Hold Switch Assembly, no sound comes, Headphone Jack Not Working, no audio, jack on logic.
You May Also Want
A fresh battery is often replaced during the same repair while the iPod is open.
Related: 128GB Flash Mod Kit (CF-to-SDXC Adapter + 128GB SD Card Included)Flash storage is the common upgrade path while the iPod is already open.
Related: Replacement Headphone / Lock Top BezelHeadphone jack is accessed from the top — top bezel removal required.