
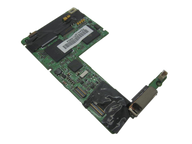
Representative photo. You receive the part named above.
iPod 3G — Replacement Logic Board
Used (Apple Original) · Model A1040
$45.95
Sold out
Not for sale right now
We are not selling this part at the moment.
- Used (Apple Original). Tested: installed in a working iPod and checked before it ships.
- 1-year limited warranty · 30-day returns from delivery
- Free pry tool in the box
- Completed repairs aren't refundable. If a part we fitted fails within a year, we repair it again.
Part details
About this part
Overview
Replacement logic board for iPod 3rd Generation A1040, commonly searched as iPod 3G. Use it only after FireWire power, battery, 50-pin Toshiba MCD-D50 PATA storage, touch wheel, touch-button, headphone/Hold, and dock-path checks point back to the board. Fitment cue: confirm the four separate touch buttons above the wheel.
Fitment snapshot
Confirm A1040, four separate touch buttons above the wheel, FireWire charging behavior, board marking, order number, and case-route nearby parts.
Product Overview
If you searched for ipod 3rd generation logic board replacement, use this listing to decide whether the board is really the right part for an iPod 3rd Generation.
The most important 3G rule is charging: this generation charges from FireWire power through the 30-pin dock connector. USB can sync data, but a USB cable not charging the iPod is normal for this model and is not proof that the board has failed.
Two board markings are established for this model: 820-1430-A from earlier production and 820-1559-A from later production. Both are sold for all five capacities. Match the number printed on the board you removed, and the connector layout beside it, before ordering.
Folder icons, sad-iPod behavior, audio faults, and control faults can end at the logic board, but they usually have cheaper checks first: FireWire power, battery, 50-pin IDE/ATA storage ribbon, drive or flash adapter, touch-wheel cable, touch-button strip, headphone jack, Hold switch, and dock path.
What Is Included
Condition: Used factory-original part. Quantity and exclusions: The listed part, set, pair, or configuration above is supplied with exactly one plastic pry tool. No other parts, tools, adhesives, or materials are included unless they are explicitly listed above.
Fit and specs
Specifications & Fitment
Part Details
| Detail | Value |
|---|---|
| Model Number | A1040 |
| EMC | EMC 1961 |
| Condition | Used — factory original Apple part. Normal cosmetic wear expected. |
| Apple model / EMC | A1040 / EMC 1961 |
| Board markings |
820-1430-A (earlier production) and 820-1559-A (later production) — both established for this model. Match the number printed on your own board. |
| Charging path | FireWire power through the 30-pin dock connector |
| Controls | Touch wheel plus four separate touch-sensitive buttons |
| Storage connector family | 1.8-inch Toshiba/iPod 50-pin IDE/ATA ribbon path |
| Audio codec | Wolfson WM8731 (WM8731/L family) |
| Charger IC | Linear Tech LTC1733 on the FireWire input path |
| CPU | Dual ARM7TDMI, 90 MHz |
| LCD Controller | Renesas HD66753 |
| PMU | NXP PCF50605HN |
| RAM | 32 MB |
| SoC | PortalPlayer PP5002 |
Compatible Variants
| Order Number | Capacity | Color | Case | Compatible | Notes |
|---|---|---|---|---|---|
| M8976LL/A | 10GB | White | thin | Yes | — |
| M8946LL/A | 15GB | White | thin | Yes | — |
| M9460LL/A | 15GB | White | thin | Yes | — |
| M9244LL/A | 20GB | White | thin | Yes | — |
| M8948LL/A | 30GB | White | thick | Yes | — |
| M9245LL/A | 40GB | White | thick | Yes | — |
Install and repair
Install Overview
This is a no-solder logic-board replacement, but it is still a connector-fragile 3G case-opening job. The Repair Guide below carries the install summary and the 9 logic-board steps.
Before You Start
Charge and test from known-good FireWire power before calling a no-charge or no-power symptom a board failure.
The 3G case opens from the side clips, and the headphone-jack ribbon still connects the rear panel to the front half.
Pull connector housings straight up. Do not pull on the battery, headphone, display, storage, or touch-wheel ribbon itself.
The logic-board guide disconnects the orange touch-wheel cable, then removes 6 black T6 Torx screws securing the board.
The plastic Hold slider must mate with the small board switch nub before the case closes.
Repair steps
Documented repair-procedure steps for replacing the logic board on this model (from teardown guides; confirm against your unit before starting):
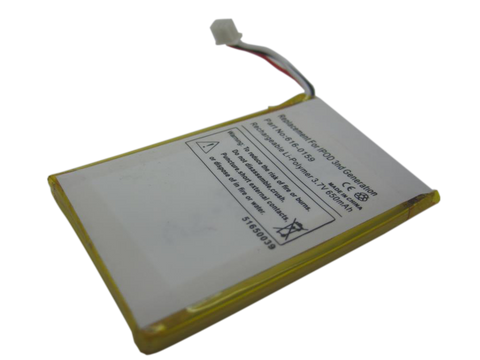
- Carefully disconnect the white battery connector from the logic board. Be sure to pull only on the connector itself and not on the cables.
- Lift up the hard drive with one hand and carefully disconnect the hard drive ribbon from the logic board.
- Use a spudger to carefully disconnect the orange touch wheel cable from the logic board.
- [CAUTION] Remove the black T6 Torx screw from near the battery connector on the logic board.
Disassembly Guide
Disassembly guide summary: iPod 3rd Generation Logic Board Replacement.
Show all 9 installation steps
Before you open the iPod, confirm that the hold switch is in the locked setting. The orange bar should be showing, indicating hold is active.
Move an opening pick as far as possible into the gap between the plastic front and the metal back panel, on the right edge of the iPod. You may have to rock the pick back and forth to move it in farther. With the opening pick, lever up against the plastic front panel and release 5 retaining tabs. Slide the pick along the iPod edge and keep levering gently until the remaining retaining tabs release. In this step, after all five tabs along the right edge are free, the case should open easily.
The iPod case is now open, but do not separate the two halves yet. An orange ribbon cable still connects the headphone jack to the logic board. With the dock connector at the top, open the case like a book and set the rear panel beside the iPod front half.
With a plastic tool or your fingernails, carefully detach the orange headphone jack cable. Make sure to draw straight up on the connector, not the cable itself. The headphone jack connector is unusually tall. When levering, keep the lower plastic connector body attached to the ribbon cable. Lever between the connector and socket, not between the connector halves.
Raise the hard drive with one hand while carefully detaching the hard drive ribbon from the logic board. Raise the hard drive out of the iPod.
Carefully detach the white battery connector from the logic board. Pull only on the connector housing, not the cables.
With a spudger, carefully detach the orange touch wheel cable from the logic board.
Take out the 6 black T6 Torx screws holding the logic board to the front panel.
Raise the logic board out of the iPod. During reassembly, confirm that the plastic hold switch mechanism lines up with the logic board hold switch. The board switch is a small black nub that fits into a slot on the hold switch mechanism.
Product-specific placement, reassembly, and check
- Prepare and access. Confirm the exact model and listing fit first. Use the existing steps as a disassembly guide, gather the specified tools, disconnect power where applicable, and keep screws and cable positions organized.
- Place Replacement Logic Board. Install only the exact board variant after every adjacent cable and assembly has been isolated, then reconnect each interface in its original position.
- Reassemble without force. Reverse only the access steps needed for this repair, keep cables clear of case edges and screw posts, and close clips in stages.
- Validate before final closure. Before final closure, validate startup, charging, storage recognition, display, audio, and controls; a generic symptom alone is not proof of a board fault.
Stop condition: Stop if a connector, latch, screw, clip, housing edge, or the replacement part resists normal alignment. Recheck model fit, orientation, cable routing, and trapped hardware instead of forcing it.
Troubleshooting
Quick Diagnosis: Is It The 3G Logic Board?
Start here before buying the board. The goal is to separate true board-side failure from normal FireWire-only charging behavior, storage faults, replaceable ribbon assemblies, and generation confusion.
Identify your board before you order
- Year and model. This board belongs to the iPod 3rd Generation, model A1040, sold from 2003 into 2004. Its giveaway from the outside is the row of four separate touch-sensitive buttons above the touch wheel; if your iPod has no separate button row, it is a different board family.
- Capacity. Capacity does not split this board. The same board served 10GB, 15GB, 20GB, 30GB and 40GB units — the thick 30/40GB case holds a taller hard drive, not a different board — so no capacity story on a listing tells you whether a board fits.
- Memory. Every 3G board carries 32 MB of RAM on the PortalPlayer PP5002. There is no larger or smaller memory option to match.
-
The printed number. Read the 820- number silkscreened on your own board before ordering. Two are established for this model:
820-1430-Afrom earlier production and820-1559-Afrom later production. Sellers list them together across all five capacities, and we have no bench proof that one drops into a unit built with the other — so match what you removed and treat any claim of interchange as unverified.
| What you see | Check first | Logic board makes sense when |
|---|---|---|
| Dead or no signs of life | Charge from a known-good FireWire power source, turn Hold off, then reset: slide Hold on and off again and hold Menu + Play/Pause until the Apple logo appears (this is a touch-wheel iPod — Menu + Select belongs to the later click-wheel models). Then check the battery connector. | The board becomes plausible when FireWire power and a known-good battery still give no screen, drive spin, response, or computer recognition. |
| Won't charge | Separate normal USB behavior from a fault. The 3G can sync by USB, but it needs FireWire power to charge. | Board diagnosis starts only after FireWire power, battery, dock path, and battery connector checks fail. |
| Folder icon, sad iPod, or restore loop | Test storage first: the 1.8-inch drive or flash adapter, the 50-pin IDE/ATA ribbon, stable power, and restore workflow. | A board-side storage path is plausible when known-good storage and cable checks still fail. |
| No audio, one channel, static, or Hold trouble | Check headphones, dock or line-out behavior, the headphone jack / Hold switch assembly, and its ribbon seating. | Logic-board audio work is late-stage diagnosis after the replaceable audio/Hold path is ruled out. |
| Wheel or button input problem | Check the orange touch-wheel cable, the four touch-sensitive buttons, Hold state, and connector seating. | The board becomes plausible when known-good control parts and clean board contacts still do not respond. |
| Wrong generation clues | Look for four separate touch buttons above the wheel. A 4th-generation integrated wheel-button design is a different board family. | Use this listing only for the iPod 3rd Generation / iPod (Dock Connector) board path. |
Failure Signs
Power or charging still fails after FireWire checks
- Buyers may describe it as: dead iPod, no power, no signs of life, iPod 3rd generation not charging, or iPod 3rd gen won't charge.
- Check first: known-good FireWire power, battery connector seating, battery health, dock pins, and Hold/reset state.
- Choose the iPod 3G logic board when: the iPod still cannot power, charge, or respond from FireWire power after battery and dock-path checks.
- Do not diagnose a bad board from USB charging behavior alone; USB charging is not the 3G charging path.
Board-side dock or connector damage
- Buyers may describe it as: damaged 30-pin dock path, sync trouble after cleaning, bent pins, corrosion, liquid damage, or a connector damaged during repair.
- Check first: cable, host, FireWire power, USB sync cable, dock debris, and whether the problem follows the iPod rather than the cable.
- Choose the iPod 3G logic board when: the board-side connector path is physically damaged or still fails with known-good external cables and power.
- Connector phrases are diagnostic context here, not a promise that a generic accessory connector is the correct part.
Storage remains undetected after drive and cable checks
- Buyers may describe it as: folder icon, sad iPod, restore loop, drive not detected, failed restore, or flash adapter still not seen.
- Check first: the 1.8-inch drive or flash adapter, the 50-pin IDE/ATA ribbon, cable seating at both ends, and stable FireWire power.
- Choose the iPod 3G logic board when: known-good storage and cable still fail, or the board-side storage contact is torn, corroded, or lifted.
- Storage warnings are more often storage or cable work than logic-board replacement. To test storage directly, put the iPod into Disk Mode. Disk Mode on this model: slide Hold on and off, hold Menu + Play/Pause until the Apple logo, then hold Previous + Next until the Disk Mode screen appears; Menu + Select leaves it again. Previous + Next is this model’s Disk Mode — Center + Play/Pause is the click-wheel models’ sequence and does nothing here. If it mounts as a drive, the board’s storage path is doing its job.
Controls still fail after wheel and button-strip checks
- Buyers may describe it as: touch wheel not responding, Menu/Play/Next/Previous not responding, button strip trouble, or control failure after opening.
- Check first: orange touch-wheel cable seating, button-strip condition, Hold state, front-panel alignment, and connector damage.
- Choose the iPod 3G logic board when: known-good control parts and clean board contacts still fail.
- The 3G uses a touch wheel plus separate touch buttons; later integrated wheel-button assumptions can mislead the repair.
Audio remains bad after headphone/Hold assembly checks
- Buyers may describe it as: no sound, one channel, distorted audio, dock output mismatch, or audio failure after repair.
- Check first: known-good headphones, dock or line-out output where available, headphone jack / Hold switch assembly, and ribbon seating.
- Choose the iPod 3G logic board when: both output routes or the board-side audio path remain bad after replaceable audio/Hold parts are ruled out.
- Do not make the board the first purchase for one-channel headphone audio.
Visible board damage
- Buyers may describe it as: liquid damage, corrosion, burnt smell, broken connector, lifted socket, missing small parts, or localized heat.
- Check first: whether the damage is on the board itself or only on a removable cable, jack, battery, storage, or front-panel part.
- Choose the iPod 3G logic board when: the logic board has visible board-side damage that matches the symptom.
- Stop power testing if corrosion, heat, or a burnt smell is present.
| Symptom | What it means & what to check |
|---|---|
| Symptom remains after basic checks |
What you may see: The iPod still points back to Replacement Logic Board after cable seating, battery stability, and nearby connector checks. Check first: Retest with known-good cables or adjacent parts where practical before ordering. Check next: A nearby cable, connector, battery, storage device, display path, audio path, or board path can mimic a bad logic board. |
| won't charge from USB, overheats near dock connector, won't turn on, overheating | Check battery, dock power, storage load, and connector seating before moving to the board. |
| Apple-logo loop, continuous reboot, FW FAIL, 1394 FAIL, empty battery icon with fully charged battery, folder with question mark, Dropped / Not Working, open damaged, Physical Damage, Won't Restore, usb can sync but cannot charge, replaced hard drive and restore fails with error 1429 | Use this as a board-level clue only after adjacent assemblies and ribbons have been checked. |
| Related checks |
|
Do Not Buy This Board Yet If...
| Situation | Start here instead |
|---|---|
| The only problem is that a USB cable will not charge the iPod. | 3G charges via FireWire only. USB not charging is normal, not a board failure. |
| The iPod shows a folder icon, sad iPod, clicking drive, or restore failure. | Check the 50-pin hard drive, flash adapter, IDE cable, and stable power path before the board. |
| The iPod does not have four separate touch-sensitive buttons above the wheel. | Check button layout first; 3G has four separate touch-sensitive buttons above the wheel. |
| The symptom is only one-channel headphone audio, Hold switch trouble, or a damaged headphone jack assembly. | Check the headphone jack / Hold switch assembly first. |
| The symptom is only a display, front-panel, touch-wheel cable, or button-strip issue with no board-side connector damage. | Check that visible part, cable, or button route first. |
| You are trying to replace a loose accessory cable, vehicle adapter, or generic 30-pin cable rather than the internal logic board. | Replace or test the external accessory instead. |
You have not compared 820-1430-A / 820-1559-A against the removed board and the connector layout inside the iPod. |
Match the removed board marking and connector layout before ordering. |
| You are choosing by iPod Classic 3rd Generation wording alone. | Treat that phrase as common reader search language; this model predates the Classic branding. |
Worth Knowing
- The iPod 3rd Generation charges only from FireWire power through the 30-pin dock connector. USB can sync data but does not charge this generation.
- Two board markings are established for this model — 820-1430-A (earlier production) and 820-1559-A (later production) — and both are sold across all five capacities. Whether one substitutes for the other in a given unit is not something we have verified on a bench, so confirm the removed board marking and connector layout and match it.
- The 3G control layout is a touch wheel with four separate touch-sensitive buttons above it, not the 4th-generation integrated wheel-button design.
- Folder or sad-iPod behavior belongs on the storage and 50-pin IDE/ATA cable path first unless known-good storage and cable checks still fail.
Won't Charge: What Owners Describe
On the iPod 3rd Generation, Won't Charge can describe more than one observable problem. These paraphrased owner reports are anecdotal starting points for diagnosis, not proof that any single part failed.
Anecdotal owner reports (not a guarantee or authoritative proof): - One owner reported that a newly installed battery used its remaining charge but would not recharge. - Another owner reported that a replacement battery worked for a day, then the iPod showed a battery warning and shut down after an overnight charge. - A separate owner reported that, after a battery replacement, the iPod showed the Apple logo and a low-battery warning but would not stay on long enough to enter disk mode. - Another owner reported that the computer recognized the iPod after a battery replacement, but several chargers and cables still did not charge it.
Owners searching for this describe it as: iPod 3rd Generation Won't Charge, iPod won't charge, replacement battery won't charge.
What Owners Report
These are anecdotal owner reports, not guarantees or authoritative proof that a particular part will fix a symptom. Use them as a troubleshooting starting point: confirm the symptom, run the quick checks, then match the fix.
Burst component on the logic board — identify and replace?
Symptoms. A small component at the bottom of an A1040 logic board has visibly burst; the owner wants its identity and a replacement source.
Quick diagnosis.
- Read the board designator printed beside the part, not the part itself: a "D"-prefixed designator marks a diode. The part in this thread sat at a D-designator position, and its three terminals are consistent with a dual-diode package — package shape alone does not give the electrical type or value.
- One owner with a spare board reports the position marked DZ3, with a companion DZ1 nearby — treat any role story about these parts as owner speculation; the record holds no verified function map for this board.
Fixes.
- Donor-board component swap (owner-reported) — the only reported path to an exact-value replacement is lifting the same-position component from a donor 3G board, since no schematics or board drawings for this model have ever surfaced to identify the part's value for ordering.
- Board replacement (the documented lane) — component-level repair on this model is undocumented territory; the documented repair path is replacing the logic board itself. Two board part numbers are established for this model — 820-1430-A (early production) and 820-1559-A (late production) — and vendors sell both across all capacities; match the number printed on your board. Boards are donor-salvage parts: none were ever reproduced.
- Fit boundaries — this model's board is its own: earlier-generation and later-generation full-size boards are different designs and do not interchange with it.
Cautions.
- Never buy a board on a capacity story alone — the printed 820- number on the donor is the match that matters.
- A burst power-path component can be the symptom of a larger fault; if a swapped-in component bursts again, stop and move to the board-replacement lane.
Community signal. Reported by 1 owner; three contributors, one with donor-board bench observations.
Questions
Common Questions
Why is my iPod 3rd Generation not charging?
If the search is iPod 3rd generation not charging or iPod 3rd gen won't charge, start with the charging rule: this generation charges from FireWire power, not from USB power. USB can be a sync path, but no USB charging is normal 3G behavior. Use known-good FireWire power and check the battery, dock path, and battery connector before blaming the board.
Is this the same as an iPod Classic 3rd Generation logic board?
It is the board path readers often mean by that phrase, but the official naming predates Classic branding. Treat iPod Classic 3rd Generation as search shorthand and confirm A1040, four touch-sensitive buttons above the wheel, order number, and removed board marking.
Will 820-1430-A work in place of 820-1559-A?
We cannot promise that it will. Both markings are established 3G boards and sellers list them together for every capacity, but no source we can stand behind reports swapping one for the other in a working unit, and we have not tested it. Read the number on the board you take out and match it. If you are offered the other marking, ask the seller what unit it came out of rather than treating the two as one part.
Does this fix a folder icon or sad iPod?
Not as the first repair. Folder and sad-iPod behavior should go through storage diagnosis first: drive or flash adapter, 50-pin IDE/ATA ribbon, cable seating, stable FireWire power, and restore workflow. The board is a later route when known-good storage and cable checks still fail.
What is an iPod 3G logic board or motherboard?
It is the main circuit board inside the iPod 3rd Generation. It carries the power, dock, storage, control, display, and audio paths, so many symptoms can touch it, but most symptoms still need connected parts and cables ruled out first.
Why does the page avoid later-model wheel and storage wording?
Because the 3G uses a touch wheel plus a separate touch-button strip, and its storage path is the 50-pin Toshiba/iPod IDE/ATA family. Later integrated wheel-button and flat-flex storage assumptions can send a buyer to the wrong part.
What tools and steps are involved?
The logic-board guide for this iPod is 9 steps and does not require soldering. Common tools are an iPod opening tool, spudger, and T6 Torx screwdriver. The sensitive moments are opening the case, disconnecting the headphone, battery, storage, display, and orange touch-wheel cables, removing the 6 black T6 screws, and aligning the Hold switch on reassembly.
You May Also Want
Check battery and FireWire-powered behavior before blaming a dead or no-power board.
Related: Flash Mod Service (installed by iMods)Flash storage is the common upgrade path when folder, sad-iPod, or restore symptoms point away from the board.
Related: Hard Drive IDE Ribbon CableA loose or damaged 50-pin IDE/ATA storage ribbon can mimic board-side storage faults.
Search terms
Why people land on this part
Use these symptom paths to decide whether the main board is the right part or whether a connected part should be checked first.
| Reader wording | Start with this check | When the board becomes likely |
|---|---|---|
| 3G will not charge, will not power on, or seems dead | Use known-good FireWire power and check the battery connector, battery health, dock pins, and Hold/reset state. | The board becomes the likely route only after FireWire, battery, and dock-path checks still fail. |
| Dock, sync, or connector damage after cleaning or repair | Try a known-good cable and inspect the 30-pin opening for bent pins, debris, corrosion, or damage that follows the iPod. | Choose the board when the board-side dock path is damaged or still fails with known-good outside cables and power. |
| Folder icon, sad iPod, restore loop, or storage not detected | Check the 1.8-inch drive or flash adapter, 50-pin IDE/ATA ribbon, cable seating, and stable FireWire power first. | The board is a later route when known-good storage and cable checks still fail. |
| Touch wheel, separate touch buttons, or headphone audio still fail | Check the touch-wheel cable, button strip, Hold state, headphone jack / Hold switch assembly, and ribbon seating first. | Use the board path when connected parts and clean board contacts are already ruled out. |
Also searched as: ipod 3rd generation logic board replacement, ipod 3g logic board, Physical Damage, Dropped / Not Working, dead logic board, no power logic board, won't turn on logic board, damaged large, open damaged, board assembly, FireWire iPod, FireWire only iPod, ipod 3rd generation motherboard, ipod 3rd generation not charging, ipod charging icon, battery connector, ipod 3g, ipod classic 3rd generation, ipod connector, ipod third generation logic board, ipod usb connector, pp5002 ipod, are you referring to the logic board?" — "Yes that, 30 pin dock connector.
Questions people ask
- Why does my iPod 3G charge from dock but not USB.
- Will 820-1430-A work in place of 820-1559-A
- Is iPod Classic 3rd Generation the same as iPod 3G.
- How do I tell 3rd gen from 4th gen at a glance
- Does PP5002 limit Rockbox
Search Language
Some buyers search for "iPod 3rd gen motherboard", "iPod Dock Connector logic board", "820-1430-07", "FireWire iPod", "PP5002", "PortalPlayer", "PCF50605HN", "Wolfson WM8731L", "My iPod boots to Apple logo and reboots forever", "Board gets hot near dock connector which IC is failing", or "Diagnostics shows FW FAIL what does that mean"; confirm the checks above point to this same part before ordering.
Free diagnostic
Broken iPod? We can help.
Mail us your iPod and we will test it and send you a free repair quote. If you don't like our price, we will ship your iPod back at our expense.
How mail-in repair works
Order the free diagnostic
Choose your iPod. Add our shipping box and prepaid label if you need one.
Mail us your iPod
Pack it with your work order. No printer? Put a note in the box with your name, return address, email, order number and what is wrong.
Approve your quote
We test it and email your free repair quote. Most repairs are finished within 3 to 5 business days after you approve the quote.