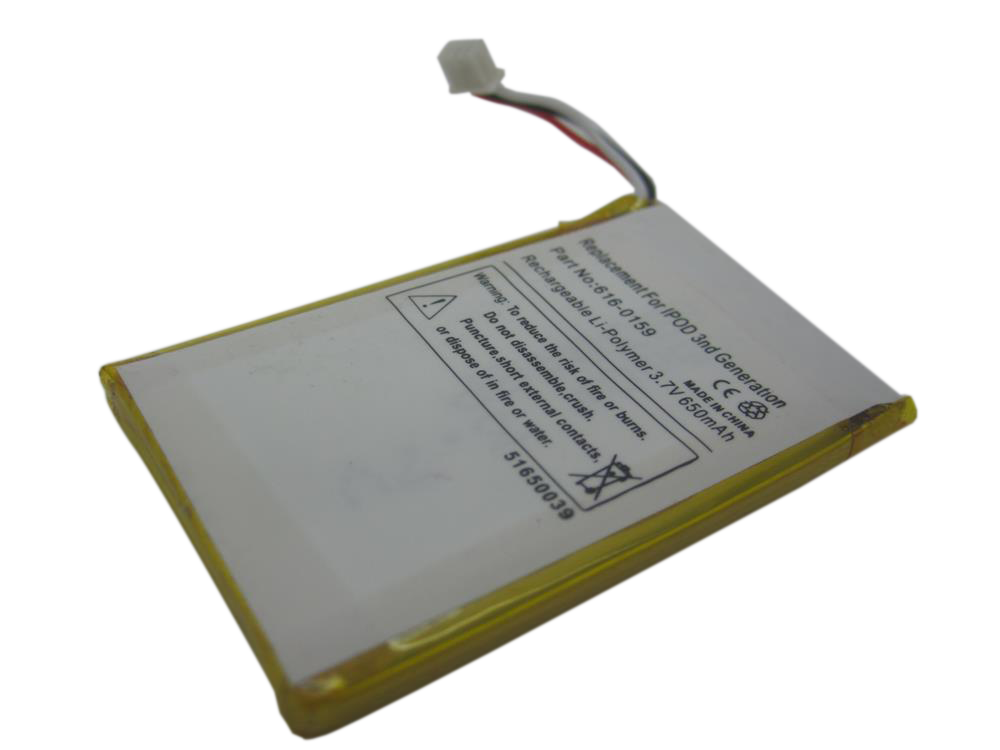
Replacement rechargeable battery for iPod 3G 10GB, 15GB, 20GB, 30GB, and 40GB models. Use it for poor runtime, swelling, or power loss after FireWire power checks, while remembering that bad storage or board faults can imitate battery trouble.
Product Overview
This battery listing covers Replacement Battery (All Capacities) and its own connector path on the iPod 3rd Generation.
Use Part Details for the confirmed part-number reference. Use the Compatible Variants table below to confirm capacity, color, case, or order-number fitment.
Choose this part when your iPod shows Won't Charge, Battery Drain, Won't Turn On, or Shuts Down Randomly; the checks below help confirm the right part before you order.
If known-good FireWire power and a properly seated battery still do not restore stable power, the problem might be the dock connector, battery connector, or something on the board, not just the battery.
What Is Included
Condition: New replacement part. Quantity and exclusions: The listed part, set, pair, or configuration above is supplied with exactly one plastic pry tool. No other parts, tools, adhesives, or materials are included unless they are explicitly listed above.
Quick Diagnosis: Is It The Replacement Battery (All Capacities)?
Start here before ordering. Work through the checks in order; a symptom alone does not prove this battery is bad until nearby parts, cables, fitment, or install issues are separated.
Before you order this battery
- Try a force restart first. Toggle Hold on and off, then hold Menu + Play/Pause for 6 to 10 seconds.
- Check battery and power stability. Do not use a USB-to-30-pin cable as the charging test on this model. It can sync but cannot provide charge power.
- Check FireWire charging power. Use a powered 6-pin FireWire source, FireWire-powered dock, or the FireWire side of Apple's USB+FireWire cable before opening the iPod.
- Check the next listed clue. Note whether the iPod shows charging, briefly powers on, shuts down under load, or never wakes at all.
- Use this listing only after the checks still point here. If the symptom still points here after those checks, compare Compatible Variants before ordering this battery.
Other Symptoms That May Involve This Part
| Symptom | What it means & what to check |
|---|---|
| red x, Won't Restore, broken, connect using firewire to restore, ipod 3rd generation won't restore, not charging, won't start up and just shows the Apple logo | Use this as a battery clue only after the iPod matches this listing's battery fitment. |
| dead | Charge from a known-good source long enough to separate deep discharge from a failed cell, then confirm the case-depth battery path. |
| overheating | Stop charging and treat these as battery-safety symptoms. Do not keep testing a swollen, puffy, hot, punctured, or leaking lithium pack. |
Specifications & Fitment
Part Details
| Detail | Value |
|---|---|
| Model Number | A1040 |
| EMC | EMC 1961 |
| Condition | New replacement battery |
| Capacity (Original) | 630 mAh |
| Capacity (High) | Replacement high-capacity SKU varies; confirm label |
| Chemistry | Li-Ion |
| Voltage (Nominal) | 3.7V |
| Connector | Wired plug-in |
| Soldering Required | No |
| Battery identifiers |
616-0159 — Apple’s own number for the original pack. E225846 is a marking that appears on replacement cells sold for this model; it is not an Apple part number, so match a replacement on fit and connector rather than on that code. |
Compatible Variants
| Order Number | Capacity | Color | Case | Compatible | Notes |
|---|---|---|---|---|---|
| M8976LL/A | 10GB | White | thin | Yes | — |
| M8946LL/A | 15GB | White | thin | Yes | — |
| M9460LL/A | 15GB | White | thin | Yes | — |
| M9244LL/A | 20GB | White | thin | Yes | — |
| M8948LL/A | 30GB | White | thick | Yes | — |
| M9245LL/A | 40GB | White | thick | Yes | — |
Failure Signs
Use these checks to decide whether this battery is the right part, whether a nearby part should be checked first, or whether the symptom needs more diagnosis.
| Symptom | What it means & what to check |
|---|---|
| Dock, USB, sync, or charging connection trouble |
What you may see: People describe charging, USB recognition, sync, or dock-connector behavior that is intermittent or missing.
Check first: Use FireWire power for charging tests; USB-only cables can sync but will not charge this model. Inspect the dock connector separately if USB recognition or sync is the issue.
Most likely cause: The battery can be involved, but cable condition, port contamination, battery state, storage behavior, or board damage can create overlapping symptoms.
Look elsewhere when: Use a known-good FireWire power source, then check battery behavior, storage restore state, dock condition, and board condition before treating the battery path as isolated. |
| Ribbon, connector, or ground-path checks |
What you may see: A symptom starts after opening the iPod or disturbing an internal flex cable. Check first: Inspect for liquid, corrosion, residue, torn flex material, or connector damage. Most likely cause: Connector seating, ribbon damage, or ground-path issues can involve this part, a nearby connector, or a board path. Look elsewhere when: Check the Replacement Hard Drive (10GB) when storage symptoms such as clicking, sad ipod, folder icons, or restore failure are the main problem.
|
| Symptoms changed after repair or reassembly |
What you may see: People describe a new problem appearing immediately after battery, storage, display, audio, or control work.
Check first: Reopen only as far as needed to inspect the areas touched during the repair.
Most likely cause: A post-repair symptom can involve the battery, but disturbed ribbons, latches, grounding, connector seating, or the wrong variant part are common checks before ordering again.
Look elsewhere when: Check the exact connector or assembly disturbed during the repair before treating the new part as failed. |
Repair considerations
Run these checks before replacing the battery — they confirm the battery is the right fix and not a nearby fault:
- Try known-good cable, charger, USB port, or computer
- Replace battery
Do Not Buy This Battery Yet If...
| Situation | Start here instead |
|---|---|
| Variant, generation, or family does not match this listing | Use this battery only for iPod 3rd Generation A1040 models; choose the matching battery listing for other iPod families. |
| You have an iPod 4th Generation Click Wheel or a later model | The 3G A1040 has four control buttons in a row above the touch wheel. If yours has no separate button row, use the matching battery path for that model; this page is only for the 3G A1040 battery. |
| You see a folder icon, clicking noise, or restore failure | Check the drive or flash media, storage cable, adapter seating, formatting, and restore path before replacing any part. |
| Only the screen is affected and everything else works | Start with the screen, display ribbon, backlight path, and battery-swelling inspection. |
| A symptom points to a different part | Start with hard-drive cable for folder, clicking, or restore symptoms; LCD screen for display-only symptoms; headphone jack for audio or Hold-switch symptoms; touch-wheel cable for touch-wheel or control symptoms; logic board for board-side damage or multi-system symptoms before buying this part. |
| Recent service or connector disturbance is the main clue | Inspect and reseat the cable, latch, or connector path disturbed during service before buying another part. |
Install Overview
Before You Start
For pre-open diagnosis, unlock Hold first. Reset it the way this generation resets: slide Hold on and then off, then hold Menu + Play/Pause until the Apple logo appears. This is a touch-wheel iPod, one generation before the click wheel, so Menu + Play/Pause is its reset — the Menu + Select combination belongs to the later click-wheel iPods and is not the reset on this model. Before opening, lock the Hold switch so the orange bar is visible, then confirm the model and variant.
Treat case opening as the highest handling risk. Work around the seams gently and stop if the shell, clips, or internal stack resist.
Do not pull the halves apart or side-load board sockets. Reseat nearby ribbons and connectors before blaming a replacement battery.
Stop charging and avoid puncturing, bending, or compressing the cell if the battery is swollen, hot, leaking, or visibly damaged.
Repair steps
Documented repair-procedure steps for replacing the battery on this model (from teardown guides; confirm against your unit before starting):
- Carefully disconnect the white battery connector from the logic board. Be sure to pull only on the connector itself and not on the cables.
- [CAUTION] Remove the black T6 Torx screw from near the battery connector on the logic board.
Disassembly Guide
Disassembly guide summary: iPod 3rd Generation Battery Replacement.
Show all 9 installation steps
Before you open the iPod, confirm that the hold switch is in the locked setting. The orange bar should be showing, indicating hold is active.
Move an opening pick as far as possible into the gap between the plastic front and the metal back panel, on the right edge of the iPod. You may have to rock the pick back and forth to move it in farther. With the opening pick, lever up against the plastic front panel and release 5 retaining tabs. Slide the pick along the iPod edge and keep levering gently until the remaining retaining tabs release. In this step, after all five tabs along the right edge are free, the case should open easily.
The iPod case is now open, but do not separate the two halves yet. An orange ribbon cable still connects the headphone jack to the logic board. With the dock connector at the top, open the case like a book and set the rear panel beside the iPod front half.
With a plastic tool or your fingernails, carefully detach the orange headphone jack cable. Make sure to draw straight up on the connector, not the cable itself. The headphone jack connector is unusually tall. When levering, keep the lower plastic connector body attached to the ribbon cable. Lever between the connector and socket, not between the connector halves.
Raise the hard drive with one hand while carefully detaching the hard drive ribbon from the logic board. Raise the hard drive out of the iPod.
Carefully detach the white battery connector from the logic board. Pull only on the connector housing, not the cables.
In this step, removing the following screw isn't strictly necessary, but it can make the next step easier. Take out the black T6 Torx screw beside the battery connector on the logic board.
Carefully thread the battery cable around the logic board end. While freeing the cable, avoid pulling upward too far on the logic board.
Raise the battery up and out of the iPod.
Product-specific placement, reassembly, and check
- Prepare and access. Confirm the exact model and listing fit first. Use the existing steps as a disassembly guide, gather the specified tools, disconnect power where applicable, and keep screws and cable positions organized.
- Place Replacement Battery (All Capacities). Seat the battery in the original battery location, route its lead or ribbon without a pinch, and reconnect it squarely.
- Reassemble without force. Reverse only the access steps needed for this repair, keep cables clear of case edges and screw posts, and close clips in stages.
- Validate before final closure. Before final closure, confirm boot and charging behavior and stop immediately for swelling, heat, odor, hissing, smoke, or leakage.
Stop condition: Stop if a connector, latch, screw, clip, housing edge, or the replacement part resists normal alignment. Recheck model fit, orientation, cable routing, and trapped hardware instead of forcing it.
After This Repair
| Check | What to do |
|---|---|
| Charge and calibrate | Charge fully from FireWire power, let it stay connected a little longer, then use it through a normal discharge and charge cycle so the meter can settle. |
| Watch the internal stack | If the case will not close easily or the battery cable must be forced, stop and verify battery dimensions and routing. |
| Still not working? | Check the dock connector, battery connector, storage load, and board power path before replacing another battery. |
Frequently Asked Questions
Use these questions to narrow the part path before ordering. They keep each answer focused on a different diagnostic or fitment decision.
What Replacement Battery (All Capacities) models does this fit?
This Replacement Battery (All Capacities) fits: M8976LL/A (10GB White), M8946LL/A (15GB White), M9460LL/A (15GB White), M9244LL/A (20GB White), M8948LL/A (30GB White), M9245LL/A (40GB White).
Do I need to solder?
No, this installation does not require soldering. Difficulty: Moderate. Estimated time: 45 minutes.
How do I know if this battery needs replacement?
Symptoms that can point to this battery include: Won't Charge, Battery Drain, Won't Turn On, Shuts Down Randomly. Check fitment, connectors, and nearby parts before treating symptoms as proof.
What first checks matter when an iPod 3rd Generation has battery or power symptoms?
Start with FireWire power and the battery path, not the board. The 3rd Generation uses a 630 mAh Li-Ion battery at 3.7 V, and local failure notes flag FireWire-only charging through the 30-pin dock; USB sync does not charge this model. For Very Low Battery, Apple-logo loops, or no power after parts work, use FireWire, reseat the battery connector, then separate PMU heat, storage, and cable symptoms.
Can storage trouble look like a bad battery?
Listen for repeated drive clicking and compare whether the symptom changes in disk mode or during restore. Disk Mode on this model: slide Hold on and off, hold Menu + Play/Pause until the Apple logo, then hold Previous + Next until the Disk Mode screen appears; Menu + Select leaves it again. Previous + Next is this model’s Disk Mode — Center + Play/Pause is the click-wheel models’ sequence and does nothing here. Reseat the hard-drive ribbon before replacing the battery again when power symptoms began after service. Listen for repeat clicking or repeated spin-up attempts before replacing storage parts. Check whether the iPod enters disk mode, restores cleanly, and is recognized by the computer. If a drive or flash adapter was just installed, recheck cable seating, adapter orientation, and formatting before buying another part.
What should I check before replacing this battery?
Inspect the battery connector and nearby ribbon paths before ordering another battery. Look for corrosion, torn flex material, or a connector that no longer clamps the battery lead cleanly. This battery helps only when the battery itself remains the isolated failure after seating checks. Check disturbed connectors first when the symptom appeared immediately after service.
Is this an iPod Classic?
Apple's 'Classic' branding started with the 6th Generation (2007). This is the iPod 3rd Generation (2003), model A1040. Apple's official name for this model is iPod (Dock Connector).
What if the replacement battery is too large?
The original pack was the same size in every capacity: one 630 mAh cell served the thin 10/15/20GB case and the thick 30/40GB case alike, because the extra depth of the thick case is hard drive, not battery. Replacement cells run 850–1,050 mAh and fit both cases. Larger extended cells are sold for this model, but their fit is not verified — if the case will not close easily, or the battery cable has to be forced, stop and check the pack’s dimensions and cable routing rather than pressing the shell shut on a lithium cell.
When is it unsafe to keep charging this iPod?
Stop immediately if the iPod smells burnt, the dock area looks melted, the battery is hot, swollen, or leaking, or liquid exposure is involved. Disconnect power, do not charge again, and inspect the battery, dock connector, and charge path before any further troubleshooting. A damaged lithium battery is a safety problem first and a repair question second.
Why people land on this part
Use the checks above to separate this battery from nearby parts before ordering.
Some buyers search for "ipod classic 3rd generation battery", "sad ipod, red x, clicking drive, restore loop, or disk-mode trouble", or "USB+FireWire cable with FireWire power"; confirm the checks above point to this same part before ordering.
Some buyers search for "people describe short runtime, charging trouble, sudden shutoff, or an ipod that will not reliably power on" or "short runtime, charging trouble, sudden shutoff, or a device that will not reliably power on"; confirm the checks above point to this same part before ordering.
Also searched as: iPod 3g battery replacement, battery dies, battery life, new battery not charging, doesn't charge, 850 mAh iPod battery, charge port, dead iPod 3rd generation, FireWire-only charging iPod, replace battery in iPod 3rd generation 32 gig, battery drained, charging when plugged, ipod 3rd gen battery 616 0159, Battery Drain, Won't Turn On, Shuts Down Randomly, battery connector, 6 pin FireWire, FireWire ipod, ipod 3g, ipod classic 3rd generation battery, ipod third generation, Won't Charge, new battery, not charging, not charge.
Questions people ask
- Replacement battery is too large?
Battery Safety & Shipping
⚠️ Lithium-Ion / Li-Po Battery Safety. This product contains (or is) a rechargeable lithium-ion/lithium-polymer battery. Charge only with a compatible charger and unplug once fully charged. Avoid charging or storing in direct sunlight or other high-heat environments. Stop using and stop charging immediately if the battery swells, bulges, gets unusually hot, hisses, smokes, or leaks. Do not puncture, crush, bend, short-circuit, or try to "deflate" a swollen cell, and never press a lifted screen or case back down — it can rupture the cell. If electrolyte contacts your eyes, flush with clean water for 15 minutes without rubbing and seek medical care; on skin, wash with water and soap. Battery service should be done by a trained technician. Recycle through an electronics or universal-waste recycler, not household trash.
Shipping. A refurbished iPod shipped with its battery installed is handled as lithium-ion batteries contained in equipment (UN3481); a loose replacement cell is handled as a lithium-ion battery (UN3480). Carrier, packaging, and destination restrictions can vary, so follow the current checkout and shipping instructions for the offered route.
Worth Knowing
- Same 630 mAh battery fits both thin (10/15/20GB) and thick (30/40GB) case variants.
- This model charges from FireWire power through the dock connector. USB can sync data but will not charge the battery.
- Use a powered 6-pin FireWire source, a FireWire-powered dock, or the FireWire leg of Apple's USB+FireWire cable for charging tests; a 4-pin FireWire port does not supply charging power.
- How to change the battery: disconnect FireWire power, open the case from the backplate seam, and swap the cell — the replacement matches the original battery size and connector, so no board work is needed.
- Battery health signs: a worn cell can die within minutes, show a low-battery message, or leave the iPod at a battery icon with an exclamation point until it has charged over FireWire — a new cell restores normal battery health.
- Aftermarket cells are commonly listed as 850mAh, and we install new cells up to 1,050 mAh in the refurbished iPods we sell. Cells in that 850–1,050 mAh range fit both the thin and the thick case; larger extended cells are sold for this model, but we have not verified that they fit.
Won't Charge: What Owners Describe
On the iPod 3rd Generation, Won't Charge can describe more than one observable problem. These paraphrased owner reports are anecdotal starting points for diagnosis, not proof that any single part failed.
Anecdotal owner reports (not a guarantee or authoritative proof): - One owner reported that a newly installed battery used its remaining charge but would not recharge. - Another owner reported that a replacement battery worked for a day, then the iPod showed a battery warning and shut down after an overnight charge. - A separate owner reported that, after a battery replacement, the iPod showed the Apple logo and a low-battery warning but would not stay on long enough to enter disk mode. - Another owner reported that the computer recognized the iPod after a battery replacement, but several chargers and cables still did not charge it.
Owners searching for this describe it as: iPod 3rd Generation Won't Charge, iPod won't charge, replacement battery won't charge.
What Owners Report
These are anecdotal owner reports, not guarantees or authoritative proof that a particular part will fix a symptom. Use them as a troubleshooting starting point: confirm the symptom, run the quick checks, then match the fix.
Will not charge, or shows the empty-battery / exclamation icon
Symptoms. A freshly replaced battery works for a few minutes, then dies and refuses to charge; battery icon with an exclamation point in a triangle at power-on; empty-battery icon despite a charged pack; the Apple logo flashes and the unit powers straight off; the hard drive spins up when the cable is plugged in but nothing charges; iTunes recognizes the iPod yet the charge indicator never appears.
Quick diagnosis.
- Cable and charger first — this is the deciding question on this model. The 3G charges over FireWire only; a USB dock cable fits and syncs, but it never charges. Apple's own user guide for the model states that the iPod cannot be charged over USB. If every "charger" you have tried ends in USB, nothing is broken yet.
- A hard drive that spins up when you plug in is the unit starting a sync session on a USB data connection — a sync attempt, not a charge.
- Inspect and clean the dock connector: bent, corroded, or dirty pins break the charge path. Do this before condemning a new battery.
- Battery-isolation test: disconnect the battery and power the unit from a FireWire charger alone — if it comes to life, the battery or its installation is the fault; if it stays dead, look at the connector and board.
- A pack that arrived deeply drained can be bench-charged once on a charger made for single lithium cells — never a bench supply or an improvised source — then retried in the unit — this separates a flat new pack from a dead charge path.
Fixes.
- Charge over FireWire — a FireWire wall adapter or a computer FireWire port is the supported charge path. Apple's dated catalogs list M9126G/A as the 2003 FireWire-plus-USB combo cable and M9688G/A as the later combo revision — either gives charging through the FireWire side while USB handles sync.
- Battery replacement — if the FireWire path is confirmed good and the pack fails the isolation and bench-charge checks, replace it. One OEM pack served every capacity: Apple 616-0159, 630 mAh. Replacement cells run 850–1,050 mAh and fit both the thin and thick case; larger extended cells are sold for this model but their fit is not verified.
- Dock connector or board path — a dead charge path with a known-good battery points at the dock connector, and past that at the logic board. Component-level charge-circuit repair is undocumented territory for this model — no schematics circulate — so a donor board is the practical end of that road. One long-running empty-icon case converged on a power-management chip that runs hot; that remains an owner report, not a documented procedure.
Cautions.
- The classic wear pattern in this family is a healthy new battery blamed for what is really a USB cable doing charge duty it never had on this model.
- Use a FireWire power adapter made for these iPods — FireWire supplies about 12 V, and adapters that exceed what the FireWire pins expect are a known hazard class.
- FireWire hardware is disappearing from modern computers, so plan around a wall adapter or a combo cable rather than a computer port.
Community signal. Reported by 11 owners — the model's most-reported issue.
Charging from a FireWire 800 port
Symptoms. Owner's computer has only a FireWire 800 port; the USB cable syncs with iTunes but will not charge; wants to know whether a FireWire 800 cable, or a 400-to-800 adapter chain, can charge the unit.
Quick diagnosis.
- The 3G is a FireWire 400 device at the dock connector. The native path is a FireWire 400 to 30-pin cable.
- USB on this model is sync-only, so a working USB connection proves nothing about the charge path.
Fixes.
- FireWire 400 cable plus a 400/800 adapter — reported by owners as a working charge path from a FireWire 800 port. One owner running a 400/800 cable found the chain delivered charge yet gave no iTunes connection over that path — sync stayed on USB. Charging behavior on FireWire 800 hardware is owner-reported rather than documented, so treat the combination as a reported path, not a specification.
- Wall charger for a deeply drained pack — one owner notes that a unit long out of use may need a FireWire mains charger first to bring the battery up before computer-port charging behaves.
Cautions.
- Keep sync expectations separate from charge expectations: on this model USB syncs and never charges, and one owner's 400/800 chain charged without syncing — two independent paths, two cables.
Community signal. Reported by 1 owner; three contributors back the thread.
Hold slider loose or dead after a battery swap
Symptoms. After a battery replacement the Hold slider is completely loose and no longer locks or unlocks the controls; in a purchased unit the same story — "battery was replaced, then the hold switch stopped working."
Quick diagnosis. The assembly we sell carries the Hold switch; the checks below are for a unit where a new assembly still leaves Hold dead.
- Open the case and look at the top edge of the board near the corner: the Hold mechanism is a small switch whose internal actuator must engage the slider button in the top plate. If the actuator tab has snapped off the switch body, the outside slider has nothing to move.
- If the switch is intact but misaligned, the toggle may simply be bent out of position from reassembly. On reassembly the outside slider and the small internal switch must sit the same way round — a mismatch reads as a dead Hold switch.
Fixes.
- Headphone-jack assembly replacement — the assembly we sell carries the Hold switch. On this model the headphone jack, the wired-remote port and the Hold switch are one flex assembly (Apple 632-0218-A), so fitting a new assembly fits a new switch. Keep the second half in view before you order: one repair guide instead describes the plastic slider being synced with a small black switch on the logic board, so if a new assembly still leaves Hold dead, the fault is board-side and that is a board repair rather than a parts swap. The assembly comes in thin-case and thick-case variants that are not interchangeable — match the part sold for your capacity's case depth (10/15/20 GB thin vs 30/40 GB thick).
- Careful re-bend — a bent-but-unbroken toggle can be eased back into position; owners who have done it stress going very gently, since a snapped toggle turns a free fix into a parts order.
- Board-side damage — one owner found the broken piece was the switch's attachment at the board connection; damage at that level can put the repair beyond the flex assembly.
Cautions.
- Work the slider mechanism only with the case open and the mechanism visible — forcing a loose slider from outside risks breaking the actuator clean off.
Community signal. Reported by 1 owner; three contributors describe the same failure anatomy.
You May Also Want
Flash storage is a common upgrade when the iPod is already open.
Related: Hard Drive IDE Ribbon CableThe IDE ribbon cable runs near the battery — inspect during replacement.
Related: Replacement Hard Drive (40GB)Use a hard drive only when restoring original-style storage; use the model's flash-storage path when a compatible adapter path is available.