Skip to product information
1 of 1

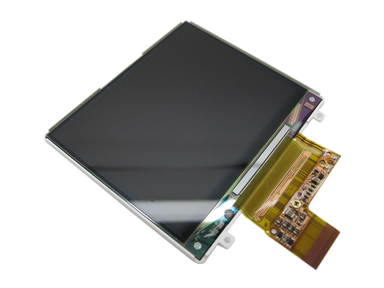
iPod Classic 7G — Replacement LCD Screen

iPod Classic 7G — Replacement LCD Screen

Regular price $87.48 USD
Regular price Sale price $87.48 USD
Sale Sold out
Screen 160GB

Replacement display assembly for iPod Classic 7G. Use it for cracked, blank, lined, or backlight-related display problems after separating screen damage from ribbon seating and board-side faults.

Product Overview

This screen listing covers Replacement LCD Screen and its own connector path on the iPod Classic 7th Generation.

Use the Compatible Variants table below to confirm capacity, color, case, or order-number fitment.

Choose this part when your iPod shows White Screen, Black Screen, backlight not working, or Screen Flicker; the checks below help confirm the right part before you order.

What Is Included

Replacement LCD Screen Free plastic pry opening tool 1 year warranty

Quick Buying Check

Buy this when

  • LCD display failure: Use the display check when the iPod still powers, plays, charges, or syncs and the LCD ribbon or connector check remains the strongest display clue.

Diagnose first when

  • Confirm the capacity match before ordering: 160GB.
  • Confirm the case thickness before ordering: thin.
  • Confirm the iPod still plays, charges, or is recognized so the screen symptom can be separated from a dead device.
  • Inspect the display ribbon and connector if the iPod has been opened or dropped.

Do not buy for

  • Check ribbon seating, liquid history, and board connector damage before treating the display as a guaranteed fix. If the clue repeats after the connector and ribbon are seated, continue with board-level diagnosis.
  • Check the storage cable, adapter setup, battery power stability, and board connector when the symptom changes after reseating or swapping storage.
  • Check the board-side connector or adjacent cable first when the damage is not on the replaceable assembly.

Specifications & Fitment

Part Details

Detail Value
Model Number A1238
EMC EMC 2173
Condition Used — factory original Apple part. Normal cosmetic wear expected.
Display Size 2.5"
Resolution 320x240 (QVGA)
Type Color TFT

Compatible Variants

Order Number Capacity Color Case Compatible Notes
MB150LL/A 120GB Black thin Yes— compatible Stock match
MB565LL/A 120GB Black thin Yes— compatible Stock match
MC040LL/A 120GB Silver thin Yes— compatible Stock match
MB147LL/A 160GB Black thin Yes— compatible Stock match
MC066LL/A 160GB Black thin Yes— compatible Stock match
MC297LL/A 160GB Black thin Yes
MB145LL/A 160GB Silver thin Yes— compatible Stock match
MC044LL/A 160GB Silver thin Yes— compatible Stock match
MC062LL/A 160GB Silver thin Yes— compatible Stock match
MC238LL/A 160GB Silver thin Yes— compatible Stock match
MC293LL/A 160GB Silver thin Yes

Diagnostic Failure Cards

Use these model-specific failure cards to decide whether this screen is the right part, a nearby part needs checking first, or escalation makes more sense after simpler checks.

Check before ordering

Sad iPod, clicking, restore, or storage trouble

What you may notice

  • People describe clicking, sad iPod or folder screens, restore loops, disk-mode trouble, or storage that will not behave after replacement.

Diagnose first when

  • Listen for repeat clicking or repeated spin-up attempts before replacing storage parts.
  • Check whether the iPod enters disk mode, restores cleanly, and is recognized by the computer.
  • If a drive or flash adapter was just installed, recheck cable seating, adapter orientation, and formatting before buying another part.
  • Confirm the iPod still plays, charges, or syncs, then reseat the LCD ribbon and inspect the display connector.

Similar issues to separate

  • Choose this display only when clicking, restore failure, or disk errors follow this part or its connection path.

Check another part first

  • Check the storage cable, adapter setup, battery power stability, and board connector when the symptom changes after reseating or swapping storage.

Repair or replacement paths

  • Replace the display only when the storage or restore symptom is tied to this part's role in the startup path.
  • Use cable, adapter, or board diagnosis first when restore behavior changes with seating, formatting, or another known-good storage device.

Advanced or board-level cases

Blank, white, black, lined, or backlight display

What you may notice

  • People describe a blank screen, white or black display, missing backlight, lines, or a display that changes after impact or repair.
  • Blank screen, white or black display, missing backlight, or lines on the screen.

Diagnose first when

  • Confirm the iPod still plays, charges, or is recognized so the screen symptom can be separated from a dead device.
  • Inspect the display ribbon and connector if the iPod has been opened or dropped.
  • Look for cracks, liquid residue, display discoloration, or connector damage before ordering.
  • If the symptom changes when the plug, cable, case, or display is gently moved, treat that as an intermittent-connection clue and inspect the relevant connector or ribbon before replacing parts.

Similar issues to separate

  • The display can be damaged, but display ribbon seating, connector condition, liquid history, or board-side display circuitry may need checking first.
  • Check display / backlight route, connector seating, and board-side damage before ordering.
  • Choose this display only when the display symptom is tied to this part or its connection path.
  • Choose this screen when the symptom remains isolated to this assembly, its ribbon, or its connector path after first checks.

Check another part first

  • Check ribbon seating, liquid history, and board connector damage before treating the display as a guaranteed fix. If the clue repeats after the connector and ribbon are seated, continue with board-level diagnosis.

Repair or replacement paths

  • Replace the display only after seating, fitment, and adjacent-part checks still point to that assembly. - Use display-panel replacement when the panel, backlight, or display flex is visibly damaged; continue connector, liquid-damage, or board diagnosis when the display changes after reseating.

Display ribbon, connector, or contact path

What you may notice

  • People describe symptoms that change after opening the iPod, reseating parts, or disturbing nearby flex cables.
  • A symptom starts after opening the iPod or disturbing an internal flex cable.

Diagnose first when

  • Inspect the relevant ribbon and board connector before replacing the part.
  • Look for lifted latches, bent contacts, debris, corrosion, creases, or torn flex material.
  • Check whether the symptom changes after careful reseating.

Similar issues to separate

  • The display may be fine while its ribbon, connector, latch, or contact path is loose, dirty, damaged, or not fully seated.
  • Connector seating, ribbon damage, or ground-path issues can involve this part, a nearby connector, or a board path.
  • Choose this display only when the part's own flex or contact path is damaged.

Check another part first

  • Check the board-side connector or adjacent cable first when the damage is not on the replaceable assembly.

Repair or replacement paths

  • Reseat or clean only where the repair procedure supports it.
  • Replace the display when the flex, connector tail, or assembly contact path is physically damaged.

Fitment or model-variant mismatch

What you may notice

  • People ask whether a similar-looking part from another capacity, case thickness, or generation will work.

Diagnose first when

  • Match the exact model, generation, capacity, and case style shown for the product.
  • Do not use a symptom to override fitment: a wrong-variant part can create new symptoms after installation.

Similar issues to separate

  • This display may help only when it matches the model and variant being repaired.

Check another part first

  • Check fitment before replacing nearby parts or ordering another copy of the same wrong variant. If the clue repeats after the connector and ribbon are seated, continue with board-level diagnosis.

Repair or replacement paths

  • Use the display variant matched to the exact iPod.
  • Recheck fitment before diagnosing a newly installed part as defective.

Liquid, corrosion, or residue context

What you may notice

  • Symptoms follow liquid exposure, dirty contacts, corrosion, or residue.

Diagnose first when

  • Inspect for liquid, corrosion, residue, torn flex material, or connector damage.

Similar issues to separate

  • Liquid or corrosion can involve this part, a nearby connector, or a board path.

Check another part first

  • Check the Replacement Battery (160GB) when power, charging, runtime, or swollen-battery behavior is the main problem.
  • Check the Replacement Click Wheel (Black) when controls, wheel, center/select, menu, hold, or unresponsive-button symptoms are the main problem.

Symptoms changed after repair or reassembly

What you may notice

  • People describe a new problem appearing immediately after battery, storage, display, audio, or control work.
  • A new symptom appeared after battery, storage, audio, display, or control work.

Diagnose first when

  • Reopen only as far as needed to inspect the areas touched during the repair.
  • Compare the new symptom with what worked before the repair.
  • Check cable seating, latch position, and part variant before replacing a second part.

Similar issues to separate

  • A post-repair symptom can involve the display, but disturbed ribbons, latches, grounding, connector seating, or the wrong variant part are common checks before ordering again.
  • Check post-repair regression, connector seating, and board-side damage before ordering.
  • Choose this display only when the part itself was torn, creased, or damaged during service.

Check another part first

  • Check the exact connector or assembly disturbed during the repair before treating the new part as failed. If the clue repeats after the connector and ribbon are seated, continue with board-level diagnosis.

Repair or replacement paths

  • Correct seating, latch, or variant problems first.
  • Replace the display when the repair damaged that assembly or its flex path.

Symptom remains after basic checks

What you may see: The iPod still points back to Replacement LCD Screen after cable seating, battery stability, and nearby connector checks.

Check first: Retest with known-good cables or adjacent parts where practical before ordering.

Check next: A nearby cable, connector, battery, storage device, display path, audio path, or board path can mimic a bad screen.

Symptom changes when touched or reseated

What you may see: The symptom changes after moving the part, reseating a cable, or applying light pressure near the connector path.

Check first: Inspect the connector, latch, flex, solder joints, and nearby board area for damage or corrosion.

Check next: This can still be a connection issue rather than a failed screen alone.

Problem began after another repair

What you may see: The issue started immediately after opening the iPod, replacing another part, or disturbing an internal cable.

Check first: Reopen only as far as needed and inspect the exact area touched during the previous repair.

Check next: Post-repair symptoms often trace to seating, latch, screw, or cable issues before Replacement LCD Screen itself is confirmed bad.

Do Not Buy / Problems This Screen Does Not Fix

Situation Start here instead
You see a folder icon, clicking noise, or restore failure Confirm restore behavior, storage fit, and setup state before ordering this part.
Cable, computer, sync, or port behavior is the primary problem Start with the dock connector, cable, host, or port checks when sync or port behavior is the main problem.
Variant or capacity does not match this listing Confirm exact model, capacity, case, and variant fit before ordering.
Charging, swelling, runtime, or power is the primary problem Start with the battery, charger, and power checks when charging, runtime, swelling, or no-power behavior is the main problem.
The problem is the Hold switch or headphone jack, not this part Verify the Hold slider, lock indicator, and shared headphone/Hold cable before replacing this part.
Recent service or connector disturbance is the main clue Inspect and reseat the cable, latch, or connector path disturbed during service before buying another part.
A symptom points to a different part thin.

Install Overview

Before You Start

Confirm the model and reset state

Turn Hold off, use the reset sequence for this generation, and confirm the model and variant before opening the iPod.

Open the case slowly

Treat case opening as the highest handling risk. Work around the seams gently and stop if the shell, clips, or internal stack resist.

Protect nearby connectors

Do not pull the halves apart or side-load board sockets. Reseat nearby ribbons and connectors before blaming a replacement screen.

Guide checkpoint

Do not fully separate the case halves until the remaining ribbons are released; the back panel can still be connected by ribbon cables. Reseat and protect the display ribbon during reassembly before assuming the panel itself is bad.

Repair Guide

Repair guide summary: iPod Classic Display Replacement.

DifficultyVery Difficult
Time30 minutes - 1 hour
Steps34
SolderingNo
Common tools1.5" Thin Putty Knife, Plastic Opening Tools (2-3), Metal Spudger, Phillips #00 Screwdriver, Spudger (Nylon)
Show all 34 installation steps
1

This iPod case is unusually hard to open without damaging major components. Its metal faceplate, metal backing, and thirteen metal clips make disassembly especially demanding. Caution: this opening method can significantly damage the iPod beyond its current condition. Keep a few extra plastic opening tools nearby, since they are easy to ruin while opening the case. Confirm that the hold switch is locked before you open the iPod.

2

Opening this iPod is challenging, so do not get discouraged if it takes a few tries. Watch the plastic opening tool tip angle as you insert it into the iPod; keep it as vertical as possible while still clearing the rear panel edge. Guide a plastic opening tool into the seam between the front and rear of the iPod.

3

Slide a second plastic opening tool into the seam between the iPod front and rear, keeping the two tools at least 1.5 inches apart.

4

Working at an angle, carefully slide a putty knife about 1/8 inch into the gap between the two opening tools. You will find thin metal rails running along the inside of the back panel, so work very carefully when inserting the putty knife. After the putty knife clears the rear panel lip, rotate it vertical and carefully but firmly work it straight down through the opening tool gap.

5

Press on the rear panel behind the putty knife with your fingers to reduce bending. Slowly flex the putty knife so most metal tabs along this side of the iPod release. The idea is to control how the rear panel bends instead of trying to prevent all bending. Any side bend should draw the rear panel lip away from the iPod, not push outward on the curved surface. This also releases as many side clips as possible.

6

Take the putty knife out, then place it closer to the iPod corner and use the same gentle wiggle method. If possible, do not bend the rear panel corner.

7

Near the headphone jack, guide a plastic opening tool into the seam between the front and rear of the iPod. It may be easier to flex the putty knife downward carefully to create more room for the opening tool. Be careful not to bend the rear panel corner.

8

Near the display center, carefully slide a metal spudger into the gap made by the plastic opening tool. A visible bump can form here in the rear panel and is hard to repair. When levering the tab free, pivot the metal spudger on the rear panel edge instead of bending the rear panel outward. With the metal spudger, release the single clip at the iPod top edge.

9

Near the other top corner, guide a plastic opening tool into the seam between the front and rear of the iPod

10

On the other side, use the opening tool to start the same case-opening gap. It may help to angle the tool stuck in the top corner to create enough room.

11

Take the opening tool out of the top corner, then slide it into the seam between the iPod front and rear. Keep at least 1.5 inches between the two tools, as on the opposite side.

12

Working at an angle, carefully slide a putty knife about 1/8 inch into the gap between the two opening tools. Again, you will find thin metal rails running along the inside of the back panel, so work very carefully when inserting the putty knife. After the putty knife passes the rear panel lip, turn it vertical and carefully but firmly work it straight down through the gap between the plastic opening tools. Press on the rear panel behind the putty knife with your fingers to reduce bending. Flex the putty knife just enough to make sure most metal tabs along this side of the iPod release.

13

The metal clips near the corners grip the front panel tightly. Release these clips before opening the iPod. Carefully slide a metal spudger into the area beside the stubborn metal clip.

14

Gently work the metal spudger downward until it is fully seated in the rear panel.

15

Gently start releasing the clip from the front panel. A visible bump can form here in the rear panel and is hard to repair. When levering the tab free, pivot the metal spudger on the rear panel edge instead of bending the rear panel outward.

16

Use the metal spudger to apply upward pressure under the front panel until the metal clip releases.

17

You will find two ribbon cables connecting the rear panel to the remaining iPod assembly. In the following step, take care not to damage these ribbon cables. In this step, grasp the front-panel assembly with one hand and the back panel with the other. Pause for a moment before continuing. Very gently release the remaining rear-panel clips by pulling the tops of the front and rear panels apart, using the iPod bottom as a hinge. Take great care not to damage the ribbon cables joining the two halves.

18

With a spudger, slide the connector upward where it holds the orange battery ribbon. Lift the locking bar only about 2 mm to release the cable. Move the orange battery ribbon out of its connector.

19

Set the rear panel beside the iPod, taking care not to strain the orange headphone jack cable.

20

Raise the hard drive with one hand to expose the headphone jack ribbon underneath. With a spudger, flip up the plastic tab securing the headphone jack ribbon in place. The tab can rotate up 90 degrees, releasing the ribbon cable. Move the orange headphone jack ribbon out of its connector. The rear panel is now released from the iPod.

21

After opening, check the lower-case clips. If any clip bent upward, press it back down gently so the rear case can close cleanly.

22

Use the broad, flat face of the metal spudger to press the clip downward. Work carefully so the thin metal rail does not tear away from the rear panel. While shaping these clips, take care not to damage any headphone jack parts.

23

Set the rear panel on its side on a clean, hard surface. Carefully but firmly press it downward, rolling the full lip edge back into place. You may need to repeat this several times to straighten the sides well. Slightly overcorrecting the case edges inward is better than leaving them too far out, because reseating the front panel will bend the rear panel back into alignment. Once the rear panel is restored to good condition, continue with the iPod repair.

24

Rotate the hard drive out of the framework, then set it with the connector facing upward. With a spudger, lift the small black locking tab for the orange hard drive ribbon. The tab rotates upward 90 degrees and frees the ribbon cable.

25

Move the orange hard drive ribbon cable straight out of its connector. If the replacement hard drive did not include rubber mounting brackets or foam padding, transfer those parts from the old drive.

26

Take out the three Phillips screws that secure the front panel to the metal framework.

27

Rotate the iPod 180 degrees and take out the 3 Phillips screws holding the front panel to the metal framework on the other edge.

28

In this step, gently work around the edges of the device to separate the front panel from the gray metal framework. You may meet some resistance, as you will find a mild adhesive used to help hold the two parts together.

29

Lift the full framework away from the front panel; it carries the screen, logic board, and click wheel. Confirm the click wheel button is seated before reinstalling the framework in the front panel.

30

The front panel is now released from the iPod.

31

With a spudger, lift the plastic tab that holds the orange display ribbon. The tab rotates upward 90 degrees toward the display and releases the ribbon cable.

32

Move the orange display ribbon cable directly out of its connector.

33

Raise the framework assembly up, and move the display and LCD metal backplate out of the framework assembly.

34

Raise the LCD metal backplate up and away from the display. Remaining assembly: display remains.

After This Repair

Check What to do
Test image and backlight Check the display before closing the case fully, then confirm brightness and image stability after reassembly.
Watch for pressure New spots, lines, or bowing after closing usually means the internal stack or ribbon routing needs another look.
Still not working? Reseat the display ribbon and inspect the connector before treating the replacement screen as bad.

Frequently Asked Questions

Use these questions to narrow the part path before ordering. They keep each answer focused on a different diagnostic or fitment decision.

What iPod Classic 7th Generation models does this fit?

This Replacement LCD Screen fits: MC293LL/A (160GB Silver), MC297LL/A (160GB Black).

Do I need to solder?

No, this installation does not require soldering. Difficulty: Very Difficult. Estimated time: 30 minutes - 1 hour.

How do I know if this LCD screen needs replacement?

Symptoms that can point to this LCD screen include: White Screen, Black Screen, backlight not working, Screen Flicker, LCD display failure. Check fitment, connectors, and nearby parts before treating symptoms as proof.

What should I check before replacing this screen?

Reseat the display ribbon and inspect the latch before replacing the LCD. Check whether the iPod still plays or syncs so a display-only symptom stays separate from a dead-device route. Inspect the relevant ribbon and board connector before replacing the part. Look for lifted latches, bent contacts, debris, corrosion, creases, or torn flex material. Check whether the symptom changes after careful reseating. Choose this screen only when the display panel or flex remains the isolated failure. Choose this display only when the part's own flex or contact path is damaged. Check disturbed ribbon and connector paths first when the symptom began after service. Check the board-side connector or adjacent cable first when the damage is not on the replaceable assembly.

Why people land on this part

Also searched as: replaced screen, screen is white, completely white, dead pixels, no display, no backlight, dim screen, screen is black, screen goes black, screen went, screen flashes, screen flickers, screen with flickering, iPod classic 7th Generation LCD screen, backlight not working, LCD display failure, screen replacement.

  • Genuine Apple Parts
  • One Year Warranty
  • Satisfaction Guaranteed
View full details