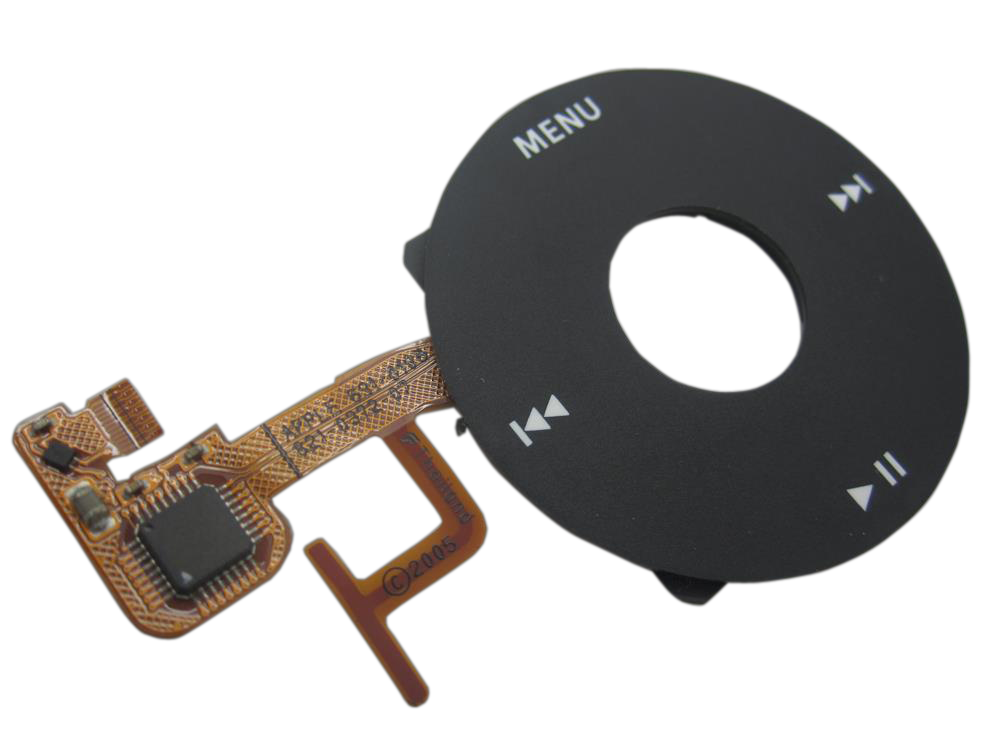
Black click wheel for iPod 5th Generation Video and 5.5G Enhanced. Choose black for black-front models; white-front models should use the white click wheel. Run the Hold switch and hard-reset checks before treating control symptoms as a click-wheel failure.
Product Overview
This listing is for the black iPod Video click wheel assembly used on iPod 5th Generation Video and 5.5G Enhanced A1136 models. It is the control-input wheel and flex path, not the Hold switch, battery, storage, or later iPod Classic A1238 click wheel. Buyers may search for ipod video click wheel replacement or ipod video 5th generation black click wheel when they need this color route.
Before ordering for a control symptom, unlock Hold and force restart the iPod with Menu + Center/Select for about 8 seconds. (Disk Mode, if you need it, is a reset followed by Center + Play/Pause; the built-in diagnostics are a reset followed by Previous + Center as the Apple logo appears — you are in when the logo comes up backwards — and its KEY and WHEEL tests exercise the buttons and the scroll ring.) If the iPod unfreezes, the click wheel may be fine. If controls still fail, inspect the click-wheel ribbon, ZIF latch, ground tab, and connector seating.
The center button cap is not included with this click wheel SKU. Order the center-button cap separately if the visible center cap is missing or damaged.
Also called the
iPod Video Click Wheel Black, black click wheel, clickwheel, scroll wheel, iPod Video 5.5G click wheel, or 5.5 Enhanced click wheel.
Choose Your Option
This part comes in multiple variants. Confirm your iPod's capacity, case depth, and order number before ordering.
Replacement black click wheel for iPod 5th Generation Video. Fits all black 5G and 5.5G models.
You're viewing this optionWhat Is Included
Condition: Used (Apple Original) — factory original Apple part. Quantity and exclusions: The listed part, set, pair, or configuration above is supplied with exactly one plastic pry tool. No other parts, tools, adhesives, or materials are included unless they are explicitly listed above.
Quick Diagnosis
Check first
- Unlock Hold so orange is not showing.
- If the iPod unfreezes, the click wheel is probably fine.
- If controls still fail, inspect ribbon seating, the ZIF latch, ground tab, and connector before ordering.
Buy this when
- Click wheel not working, scroll won't work, buttons not responding, click wheel dead, or scrolling erratically continues after Hold and hard-reset checks.
- The wheel flex is torn, corroded, liquid-damaged, or physically damaged.
- You need the black factory color route for a black-front A1136 repair.
Not this part when
- Hold Switch Stuck or lock state problems point to the headphone jack / Hold-switch assembly.
- Red X, folder icon, sad iPod, restore loop, or clicking drive points to storage. A folder with an exclamation mark means the iPod cannot find its storage — the drive, its ribbon cable, or the software on it; a red X or a sad-face iPod is the same message in another style.
- Very Low Battery, swollen battery, won't charge, or dead battery points to battery or charging path.
- Only the center button cap is missing: order the center-button cap separately.
What Brings People Here
Custom build
Use a different color or finish for a personalized build after matching the correct generation and fitment.
Specifications & Fitment
Part Details
| Detail | Value |
|---|---|
| Model Number | A1136 |
| EMC | EMC 2065 |
| Condition | Used (Apple Original) click wheel |
| OEM Part | 821-0372-A |
| Also Listed As | 821-0372 |
| Interface | ZIF ribbon cable |
Customization Options
This can also be a customization choice. Click wheels and center buttons may be offered in custom non-OEM finishes, so buyers may replace working controls for a coordinated custom build as long as the control fitment matches the model.
Compatible Variants
| Order Number | Capacity | Case | Compatible | Notes |
|---|---|---|---|---|
| MA146LL/A | 30GB | thin (0.43 in) | Yes— stock match | — |
| MA446LL/A | 30GB | thin (0.43 in) | Yes— stock match | — |
| MA452LL/A | 30GB | thin (0.43 in) | Yes— color swap | Owner-verified: fits U2 Special Edition; standard color differs from the original U2 look |
| MA664LL/A | 30GB | thin (0.43 in) | Yes— color swap | Owner-verified: fits U2 Special Edition; standard color differs from the original U2 look |
| MA002LL/A | 30GB | thin (0.43 in) | Yes— color swap | Fits all 5G/5.5G; black differs from this unit’s original color |
| MA444LL/A | 30GB | thin (0.43 in) | Yes— color swap | Fits all 5G/5.5G; black differs from this unit’s original color |
| MA147LL/A | 60GB | thick | Yes— stock match | — |
| MA003LL/A | 60GB | thick | Yes— color swap | Fits all 5G/5.5G; black differs from this unit’s original color |
| MA450LL/A | 80GB | thick | Yes— stock match | — |
| MA448LL/A | 80GB | thick | Yes— color swap | Fits all 5G/5.5G; black differs from this unit’s original color |
is not compatible with
- Nothing by color — this wheel fits every 5G / 5.5G front color; pick the wheel color you want
- iPod Classic 6G / 7G (A1238) click wheel, part 821-0545-A — not cross-compatible; the iPod Video wheel is 821-0372-A
Failure Signs / When This Part Helps
| Symptom | What it means & what to check |
|---|---|
| Controls still fail after reset | Click wheel not working, scroll won't work, buttons not responding, click wheel dead, or scrolling erratically can point here after Hold is unlocked and Menu + Center/Select reset does not clear the issue. |
| Ribbon or ground path damage | A torn flex, loose ZIF connection, missing ground tab contact, corrosion, or liquid damage on the wheel path can make replacement reasonable. |
| Center button stuck | If your search was ipod video center button stuck, check the rubber pad and center cap alignment first. If the whole click-wheel flex path is damaged, the wheel assembly may be involved, but the center button cap is sold separately. |
| Post-repair control failure | If controls stopped working after battery or storage work, reseat the click-wheel ribbon and ground tab before buying a replacement wheel. |
| click wheel ground not sticking | The orange ground tab lifts off the metal framework and a lifted tab presses nothing; re-seat and re-stick it before ordering. See Install Overview. |
| iPod making clicking noise | This is a hard-drive failure symptom. Check the hard drive and hard-drive cable before ordering an unrelated part. |
| dead zones, replaced click wheel and battery and now won't turn on | Try force restart first. If it stays dead after a known-good charge source for 30+ minutes, check battery, then dock connector, then logic board. |
| Related checks |
|
Mechanism Checks
During control diagnosis, inspect rubber dome before replacing the full assembly. These terms are repair-path clues, not alternate product names.
If tactile switch, microswitch, or board-side switch is dead or damaged, start with logic-board diagnosis or professional service; the control assembly alone may not fix a board-side fault.
Diagnose first when
- Separate center/select-button-only failure from a dead scroll ring or multiple failed buttons.
- Check whether the lock indicator changes when the Hold switch moves.
- Confirm Hold is off.
- Look for corrosion, residue, or damaged contacts before ordering.
Repair considerations
Run these checks before replacing the click wheel — they confirm the click wheel is the right fix and not a nearby fault:
- Avoid over-gluing or blocking button travel
- Confirm Hold switch state before replacing controls
- Press the underlying switch directly to isolate button path
- Replace Click Wheel or control assembly
- Recenter or sparingly reattach a shifted rubber button pad
- Add button depth or spacer material when the switch path is short
Do Not Buy This Click Wheel Yet If...
| Situation | Start here instead |
|---|---|
| Hold Switch Stuck, Hold stuck, or orange lock state will not clear | Headphone jack / Hold-switch assembly first. |
| Red X, folder icon, sad iPod, clicking drive, or restore loop | Hard drive, hard-drive cable, or flash-storage diagnosis. |
| Won't charge, Very Low Battery, dead battery, or swollen battery | Battery or charging path. On the 5G Video the pack lies in the rear case directly behind the display, so a swollen cell shows as a pressure mark or bowed screen and a case that will not sit flat — not as a stiff wheel or center button, which is the older 4th-generation and Photo layout. Replace a swollen cell before ordering control parts. |
| iPod Classic 6G / 7G A1238 | Use the Classic click-wheel path; A1238 wheels are not interchangeable with A1136 iPod Video. |
| Only the center button cap is missing or scratched | Center-button cap page; this click wheel does not include the cap. |
| Normal scroll clicking sound | That can be the clicker/piezo feedback, not a hardware failure. Check Settings > Clicker before ordering. |
Install Overview
No soldering required
The click wheel connects by ribbon/ZIF path, not solder. The dock connector is the soldered part on this model, not the click wheel.
Open and separate the front assembly
Work slowly around clips and plastic tabs before lifting the front panel away from the rear housing.
Protect ZIF latches
Release and reseat the click-wheel ribbon without pulling against a closed latch.
Ground tab matters
A missing or misaligned ground tab can make a good wheel look dead.
Test before closing
Test Menu, Center/Select, Play/Pause, forward/back, scroll ring, and Hold state before snapping the case shut.
Disassembly Guide
Disassembly guide summary: iPod 5th Generation (Video) Click Wheel Replacement.
Show all 19 installation steps
Before opening the iPod, confirm that the hold switch is locked. With the iPod screen-side down and facing you, the slider should sit all the way to the right.
Do not get discouraged if the iPod takes several opening attempts; work slowly until the case releases. Release the first bottom retainer clip with the plastic opening tool. Point the tool edge toward the metal rear case to avoid scratching the plastic front.
Use these retaining clip locations: four along each side, one on top, and two along the bottom. This helps avoid frustration and reduces the chance of scratching the plastic cover.
Each side of the iPod has four retaining clips. Use a plastic opening tool to separate the plastic front from the metal rear case. Slide the plastic opening tool into the iPod's left side with the tool edge pointed toward the metal rear case. A small guitar pick can help with opening. Place it in the seam and slide it around the case to release the clips more smoothly. Gently enlarge the existing crevice by wiggling the plastic opening tool and moving it to the left. Keep working this way until the entire side of the iPod is loose. Then slide a plastic opening tool to the right of the Hold button. Work very carefully while inserting the tool because the display is fragile.
Gently glide the plastic opening tool on the top of the display, making sure to release the retaining clips. The other sides of the iPod should now release easily. If they do not, work plastic opening tools along the right side the same way you did on the left side. In this step, separate the front of the device from the back about an inch (or a couple of centimeters). The iPod casing is now open, but do not fully separate the two halves yet. Two ribbon cables still connect the back panel to the remaining iPod assembly.
With angled tweezers or a plastic opening tool, slide the brown connector latch upward where it secures the orange battery ribbon cable. Pull from both sides of the latch. Lift it only about 1-2 mm to release the cable; do not lift farther or remove it, or the white connector may come with it. Do not raise the assembly very far; lifting too high could pull the battery connector out of the logic board. Move the brown connector straight upward. It is fragile and can break if shifted to the side. Hooks at the bottom hold the cable in place. If an arm breaks, reinstalling the battery cable becomes difficult; put the cable in the slot and press the brown holder into place to stop the cable from slipping out. Take the cable out of the connector.
At this stage there should be one orange ribbon cable still attaching the front housing to the back. At this stage you are able to take out and replace the blue rubber bumpers, or keep going with separating the case. You can replace the battery without separating the case, but opening it farther can make the work easier. Doing so requires one extra cable removal and adds some damage risk.
Raise the hard drive so the headphone jack ribbon connector is exposed. If the hard drive bumpers come loose, put them back with the notch seated in its original orientation.
With the plastic opening tool, gently raise the brown tab of the headphone ribbon cable connector. The tab can rotate up 90 degrees, releasing the ribbon cable. With your fingers, draw out the headphone jack ribbon cable.
The front and rear case halves should now be fully separated.
With a small plastic opening tool, release the black hinge clamping the hard drive ribbon cable. Rotate the tab upward 90 degrees toward the logic board to free the ribbon cable. With your forefinger, hold the ribbon cable in place; detach the drive from the ribbon cable. Confirm that the hard drive rubber side bumpers are installed on the drive. Use the side bumper installation guide for placement. If needed, transfer the blue foam padding from the hard drive to the replacement drive.
Take out the 3 black Phillips screws securing the front panel to the metal framework. Turn the iPod laterally 180 degrees and take out the three black Phillips screws that secure the front panel to the metal framework on the opposite side.
You may meet some resistance near the center of the device as you will find a mild adhesive used to help hold the two parts together. Carefully work along the iPod edge to separate the front panel from the metal framework. Lift the full framework away from the front panel; it carries the display, logic board, and click wheel. Confirm the click wheel button is seated before reinstalling the framework in the front panel.
The front panel should now be released from the remaining iPod assembly.
In this step, rotate the device so the black plastic tab is more accessible to you. Use a small plastic opening tool or fingernail to lift the black plastic tab that secures the display ribbon. The tab rotates upward 90 degrees toward the display and releases the ribbon cable. Use your finger to prevent the cable from lifting upwards. Rock the display loose from the frame, and next, draw it gently outwards to release the display's ribbon cable. You may have to raise the cable away from the 2 white pegs that poke through it near the side of the frame.
The display should now be released from the remaining iPod assembly. During reassembly, it is usually easier to seat the screen between the front panel and framework before connecting the cable. A new screen cable can be stiff enough to loosen the screen while the cable is being reconnected.
In this step, peel up the black tape holding the silver ground strap to the metal framework. The ground strap is very fragile, so make sure it does not break.
Turn the iPod over, then peel up the orange click wheel ground tab from the metal framework. Detach the thin ground tab only; do not detach the wider click wheel ribbon. Carefully press the logic board away from the metal framework, using the squares as push points. Mild adhesive secures the board to the framework, so avoid bending it by pushing too hard in one spot. The framework should now be free from the remaining iPod assembly.
With a small plastic opening tool, flip up the black plastic tab securing the orange click wheel ribbon in place. The black tab can rotate up 90 degrees, releasing the ribbon cable. With a small plastic opening tool, loosen the click wheel cable from the logic board. Take care not to over-bend the cable, since its electronics can be damaged. Detach the click wheel cable from its connector, and raise the entire click wheel assembly away from the logic board. The click wheel should now be separate from the remaining iPod assembly.
Product-specific placement, reassembly, and check
- Prepare and access. Confirm the exact model and listing fit first. Use the existing steps as a disassembly guide, gather the specified tools, disconnect power where applicable, and keep screws and cable positions organized.
- Place Replacement Click Wheel (Black). Align the control part with its locating features and seat only the matching ribbon or mechanical interface for this listing.
- Reassemble without force. Reverse only the access steps needed for this repair, keep cables clear of case edges and screw posts, and close clips in stages.
- Validate before final closure. Before final closure, test navigation and every affected button; reopen the fit if a control binds, sits low, or does not register consistently.
Stop condition: Stop if a connector, latch, screw, clip, housing edge, or the replacement part resists normal alignment. Recheck model fit, orientation, cable routing, and trapped hardware instead of forcing it.
After This Repair
After installing the wheel, unlock Hold and test Menu, Center/Select, Play/Pause, forward/back, scroll ring movement, and normal clicker feedback before closing. If controls still fail, recheck the ribbon seating, ZIF latch, ground tab, and center-button rubber pad before assuming the replacement wheel is defective.
Frequently Asked Questions
Does this include the center button?
No. The confirmed SKU contents say the center button cap is not included with the click wheel SKU. Order the center-button cap separately if the visible cap is missing, scratched, or color-mismatched.
Click wheel button feels stuck - do I need a new wheel?
Not always. Drop impact can shift the small rubber piece/pad under the center button, and debris around the cap can make a good wheel feel stuck. Check the center button cap, rubber pad alignment, debris, and water/liquid damage indicators first. If the pad will not stay aligned, use only a tiny amount of adhesive away from the moving cap. If the entire click wheel feels sticky, damaged, or unresponsive after reset and reseating, liquid damage frequently presents as click-wheel failure before the replacement wheel is the right repair.
What if controls stopped working after battery replacement?
Open the iPod and reseat the click-wheel ribbon, confirm the ZIF latch is closed, and make sure the ground tab is aligned. A disturbed ribbon or ground tab can mimic a failed wheel.
What if it still doesn't work after replacement?
Recheck ribbon seating, ZIF latch, ground tab contact, liquid damage, and the board-side connector before assuming the new wheel is defective.
Is this an iPod Classic 5th Generation part?
No. Apple's Classic branding started with the 6th Generation. If you searched ipod classic 5th generation click wheel, this is the iPod 5th Generation Video / iPod with Video route, model A1136 / EMC 2065, not a later A1238 Classic part.
Black or white - which do I need?
Match your faceplate color for a stock repair. Black-front builds use the black click wheel; white-front builds use the white one. The U2 Special Edition's wheel is red — a black wheel fits it but changes the look.
Everything sounds muffled since I cleaned it — is the speaker damaged?
This iPod has no music speaker. Sound comes out of the headphone jack, or through the dock's line-out; the only sound-maker inside is a small clicker on the board for the wheel and the alarm. Apple's own documentation for this era draws the same distinction — a playlist alarm needs speakers or headphones connected before you can hear it.
So muffled or scratchy music is the headphone path: try another set of headphones and another source, then look at the jack and its assembly. If dock line-out is clean and headphones are not, the headphone assembly is the likely part.
If it is the clicker that sounds different after a repair, we would rather hear it than diagnose it from a description: a changed sound is not automatically harmless, and we will not name a failed component on this evidence. Settings has a Clicker option worth checking before ordering anything. Reported by 1 owner.
Do I need to solder?
No. The click wheel uses a ribbon/ZIF connection. Soldering is not required for the click wheel.
Worth Knowing
- Supplier listings may omit the suffix: 821-0372
- Color-matched (white or black). Interchangeable between thin and thick of same color.
- Capacitive touch with mechanical center button. Single assembly.
Click Wheel Not Working: What Owners Describe
On the iPod 5th Generation Video, Click Wheel Not Working can describe more than one observable problem. These paraphrased owner reports are anecdotal starting points for diagnosis, not proof that any single part failed.
Anecdotal owner reports (not a guarantee or authoritative proof): - One owner reported that every front button stopped responding after a screen replacement, while the Hold switch still worked.
Owners searching for this describe it as: iPod 5th Generation Video Click Wheel Not Working, iPod click wheel not working, iPod buttons not responding.
What Owners Report
These are anecdotal owner reports, not guarantees or authoritative proof that a particular part will fix a symptom. Use them as a troubleshooting starting point: confirm the symptom, run the quick checks, then match the fix.
Wheel or center button unresponsive — grounding tab, seating, and worn buttons
Owners describe it as: wheel and buttons dead; the wheel physically sticking under the front panel; a center button that stops clicking after years of use; music playing while the screen has frozen; not being able to turn the iPod off.
Check first. Unlock Hold and force restart with Menu + Select for about eight seconds. Then look at seating: the click-wheel ribbon has an orange ground tab that peels up from the metal framework, and a lifted tab or a wheel off its seat presses nothing. Rubber spacers carry the wheel and center button onto switches on the board — one owner's dead center button was a spacer that had slipped.
What fixes it. Re-seat the ribbon, latch and ground tab; re-center or sparingly re-stick a shifted button pad; replace the wheel assembly when the ribbon is damaged or nothing changes.
Caution. On this build the battery sits behind the display, not behind the wheel: swelling shows as pressure on the screen. Replace a swollen cell before ordering control parts. Reported by 6 owners.
Stuck on Hold — the flex, the switch, and false locks
Owners describe it as: the iPod reports Hold permanently; it powers on but goes no further; the icon claims "charged" while nothing is plugged in; the backlight is dead.
Check first. Work the slider back and forth several times and look into the slot for lint. With Hold on, this iPod ignores every input on the click wheel and refuses to do anything, so a real lock and a false one look identical from outside — which is why a locked iPod is so often mistaken for a dead wheel.
What fixes it. The Hold switch is part of the headphone-jack assembly, so a failed switch or flex is serviced by replacing that assembly, matched to your case: thin for the 30GB, thick for the 60/80GB. Nothing sold on the click-wheel page cures a Hold state.
Caution. That ribbon runs under the battery and tears easily during battery work, which is where many of these start. Accounts of running with the flex unplugged stay reports, not a repair we recommend. Reported by 5 owners.
Click wheel or buttons stop responding after a repair
Owners describe it as: the wheel and buttons were fine before an open-and-repair (a screen swap, hold-switch work) and dead afterwards; only the Hold switch responds; the reset with Menu + Center still works but nothing registers past it; the language-selection screen cannot be advanced.
Check first. A working reset is a real clue — those buttons reach the electronics — so start with what the repair disturbed. Press every ribbon you touched fully home and close its latch. Check the wheel's seat and its ground tab against the metal frame: a lifted tab or a wheel slightly off its seat presses nothing.
What fixes it. Re-seating, most of the time, at no cost; a barely damp alcohol swab on the contact faces, dried fully; the wheel assembly when the ribbon is damaged or nothing else changes.
Caution. Work the latches gently — a torn ribbon turns a free re-seat into a bought part — and run the scroll ring and all five buttons before closing the case. Reported by 3 owners.
Click wheel unresponsive at the language screen after a reformat
Owners describe it as: after reformatting or restoring, the iPod boots to the language-selection screen and goes no further — the wheel seems dead, yet the soft reset (Menu + Center) works perfectly.
What it usually is. A working reset shows those buttons responded. It does not prove the wheel is healthy: same-model troubleshooting notes that a click wheel which is not seated correctly can stop this iPod booting properly. So treat it as a software presentation first, then check the seating.
What to try. Run the restore again, from a different computer if you have one — the owner who tracked this across several same-model units found a fresh restore elsewhere cleared it. Their other standing tip is a spell on a wall charger before anything more invasive. If it still will not advance, re-open and check the wheel's seat, its ribbon and its ground tab.
Community signal. Reported by 1 owner.
Search Language
Some buyers search for "color swap", "My controls stopped working after battery replacement", "Black or white which do I need", or "center button rubber pad"; confirm the checks above point to this same part before ordering.
Why people land on this part
Some buyers search for "jack and hold"; confirm the checks above point to this same part before ordering.
Also searched as: Frozen / Unresponsive, ipod frozen hd new, jack hold switch, lock switch, screen is frozen, buzzing and clicking sounds during reboot, click wheel not working after reformatting, iPod stuck on hold, A1136 click wheel, after replacing the battery the click wheel stopped working, Black clickwheel for A1136, Blue Click Wheel Flex, stuck apple, clickwheel battery, ipod video 5th generation black click wheel, ipod video center button stuck, Hold Switch Stuck, hold button, clickwheel, click wheel button feels stuck, click wheel ground not sticking, center button rubber pad, click-wheel ribbon, Click Wheel Not Working, jack and hold.
Questions people ask
- Will a 6G Classic click wheel fit
You May Also Want
If the Hold switch is stuck or lock state is wrong, check the headphone jack / Hold-switch assembly first.
Related: Replacement Click Wheel (White)Need the white factory color route? Use the matching click-wheel page.
Related: Replacement Center ButtonThe click-wheel SKU does not include the center button cap; order the cap separately if needed.