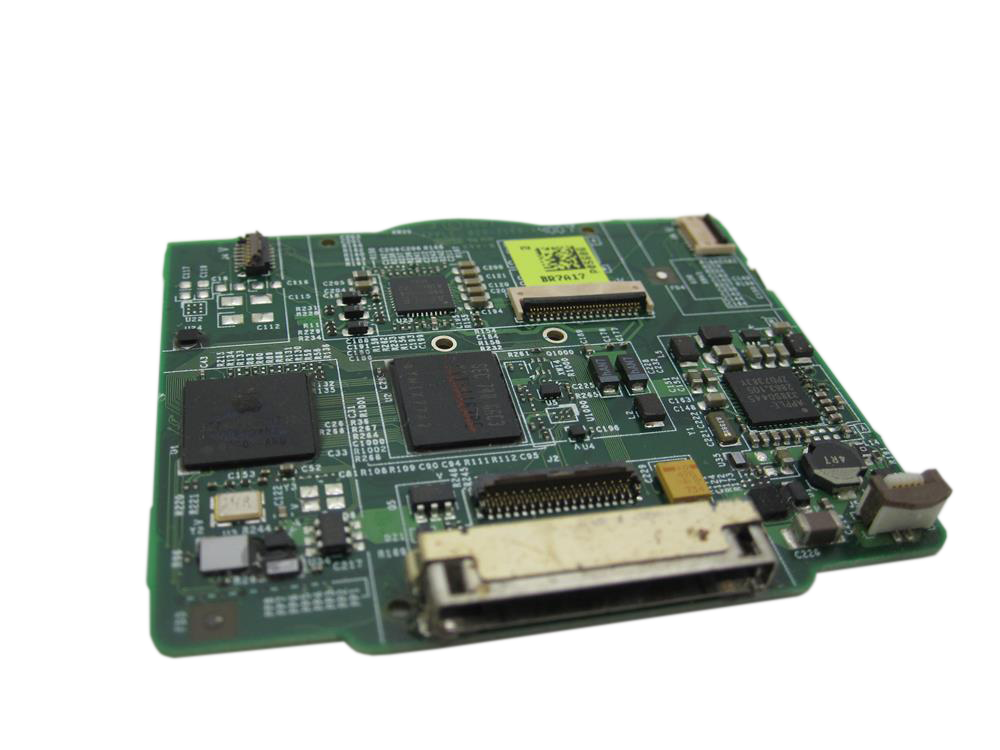
iPod Video 5G — Replacement Logic Board
Replacement logic board, also called the motherboard or main circuit board, for iPod Video 5G. Use this page when power, sync, restore, storage, audio, display, or control faults remain after the connected part, cable, battery, and connector routes have been checked.
Product Overview
Use this page if you are deciding whether the main board is the right repair path for an iPod 5th Generation Video. People often describe this part as the logic board, motherboard, or circuit board.
The most common signs of a bad logic board or faulty logic board are not single symptoms by themselves. The strongest board clues are a completely dead iPod after known-good power and battery checks, visible board corrosion, damaged board-side connectors, or a symptom that remains after the connected part, cable, and ribbon route has been ruled out.
Do not order from a rear-case model number or symptom alone. Most parts and specs references use A1136 / EMC 2065 for this family, but model-number references can conflict. Match 820-1763-A or 820-1975-A, the order number, capacity/RAM, and thin/thick case layout before buying.
Quick Diagnosis: Is It The Logic Board?
Start here if you are trying to decide whether this board is the right part. Readers often search for the most common signs of a bad logic board or the most common signs of a faulty logic board, but the useful question is which route failed: power, dock, storage, audio, display, controls, liquid, or a connector touched during repair.
Completely dead / no signs of life
- Check first: Turn Hold off, force restart, try a known-good USB cable and charger, leave it charging, then check the battery connector and dock path.
- Board becomes plausible when: Known-good power and battery still get no screen, no click, no drive spin, and no computer recognition; or the board-side battery/dock connector is damaged.
Very Low Battery loop or dies when unplugged
- Check first: Check the battery first, then inspect the fragile battery connector on the board.
- Board becomes plausible when: A known-good battery still fails, or the battery connector/latch has lifted, cracked, or corroded on the logic board.
Sad iPod, red X, folder icon, clicking, restore loop, or error 1416/1417/1429
- Check first: Start with the hard drive, ZIF cable, flash adapter, SD card, formatting, and battery load. Restore or format can erase content.
- Board becomes plausible when: Known-good storage and a known-good cable still fail, or the board-side storage connector is physically damaged.
No sound, one ear, static, or buzzing
- Check first: Test known-good headphones, then compare headphone audio with dock or line-out audio.
- Board becomes plausible when: Both outputs share the failure after headphone/hold ribbon checks, or board-side audio behavior remains after known-good output tests.
Screen, click wheel, Hold switch, or one connector stopped after repair
- Check first: Recheck the exact ribbon, latch, ground tab, or connector touched during the repair.
- Board becomes plausible when: The board-side connector or contact path is torn, lifted, corroded, or fails with a known-good replacement part.
Liquid damage, corrosion, burnt smell, or localized heat
- Check first: Stop charging, open for inspection, and locate the damage before buying parts.
- Board becomes plausible when: Damage is on the logic board itself or on a board-side connector rather than only on a replaceable cable or assembly.
Also searched as: iPod video motherboard, iPod classic 5th gen logic board, iPod classic 5th generation logic board, iPod video 30GB logic board, iPod video 30GB motherboard, or logic boards.
Failure Signs This Page Covers
Dead iPod or no power
- People describe it as: dead iPod, no signs of life, will not turn on, black screen, no click, no drive spin, not detected by the computer.
- Check first: Hold off/unlocked, force restart, known-good USB cable, charger, computer port, battery, battery connector, and dock connector.
- The logic board becomes more likely when: no response remains with known-good power and battery, or the battery/dock connector is damaged on the board.
30-pin dock, USB, sync, or charging trouble
- People describe it as: will not charge, will not sync, not recognized by iTunes/Finder, USB only works sometimes, 30-pin dock connector is broken, replacing 30 pin connector on iPod 5th gen.
- Check first: known-good cable, charger, USB port, current iTunes workflow, dock debris, bent/corroded pins, battery state, storage behavior, and restore/Disk Mode behavior.
- The logic board becomes more likely when: the board-side 30-pin dock or power path is damaged, corroded, or still fails after known-good cable, charger, battery, and storage checks.
- This iPod can charge over FireWire, but sync and restore checks must use USB.
- A damaged 30-pin connector can become a board-level repair, but cable, port, battery, and storage checks come first.
Storage warning signs
- People describe it as: sad iPod, red X, folder icon, clicking hard drive, restore loop, Disk Mode trouble, error 1416, error 1417, error 1429, flash mod will not restore.
- Check first: data recovery needs first, then hard drive, ZIF cable, flash adapter, SD card, formatting, and battery load during spin-up or restore.
- The logic board becomes more likely when: known-good storage and a known-good cable still fail, or the board-side storage connector is damaged.
- Restore or format can erase the iPod, so do not use it as a first step when the data matters.
No sound or distorted audio
- People describe it as: no sound, one ear, static, buzzing, distorted audio, audio changes when the plug or case moves.
- Check first: known-good headphones, dock or line-out comparison, headphone/hold assembly, and the headphone/hold ribbon.
- The logic board becomes more likely when: headphone and dock or line-out share the failure after output-path checks.
- Clean dock or line-out audio with bad headphone output usually points toward the headphone/hold assembly first.
- Pressure-sensitive audio is a clue, not a promise that board replacement fixes it.
- Keep audio IC and reflow ideas as professional diagnostic context, not a public DIY shortcut.
Screen, click wheel, center/Select, or Hold trouble
- People describe it as: blank screen, white screen, no backlight, lines on screen, center button stuck, Select button does not work, click wheel not working, stuck on Hold.
- Check first: Hold off/unlocked, LCD/display ribbon, button pad, click-wheel ribbon, ground tab, headphone/hold assembly, and the exact connector touched during service.
- The logic board becomes more likely when: a known-good display, click wheel, or hold route still fails, or the board-side connector is physically damaged.
- A screen-only or button-only symptom is not enough to choose a logic board.
New problem after battery replacement or opening the iPod
- People describe it as: it worked before I opened it, after battery replacement it will not turn on, after flash mod there is a sad iPod, after screen replacement there is no backlight.
- Check first: the connector you just touched, especially the battery latch, headphone/hold ribbon, display ribbon, click-wheel ribbon, hard-drive ribbon, and ground tabs.
- The logic board becomes more likely when: a board-side latch, pad, connector, or contact path is physically damaged.
- If it started after battery replacement, inspect the battery latch before ordering another board.
Liquid damage, corrosion, or visible board damage
- People describe it as: got wet, corrosion, residue, burnt smell, gets hot, dropped and stopped working.
- Check first: locate the damage before buying a part; liquid can affect the battery, dock, cables, headphone/hold assembly, storage, screen, or board.
- The logic board becomes more likely when: corrosion, burnt areas, or lifted contacts are on the board or board-side connector.
Do Not Buy This Board Yet If...
- It only shows a sad iPod, red X, folder icon, clicking drive, or restore loop and you have not tested the drive/cable/flash adapter yet.
- Only the headphone jack is bad and dock or line-out audio is clean.
- Only the screen is blank, white, lined, or dim and you have not checked the LCD and display ribbon.
- Only the center button or click wheel is failing and you have not checked Hold state, the button pad, membrane contact, and click-wheel ribbon.
- The problem started immediately after a repair or after battery replacement and you have not rechecked the connector, battery latch, or ribbon touched during that repair.
- You only know the rear-case model number or one board number. Those are clues, not a complete board-fitment answer.
Board Fitment Before Ordering
Match the board, not just the model number. Do not choose a board from A1136, 30GB/60GB/80GB capacity, or a symptom alone.
| Check | What to confirm |
|---|---|
| Known board identifiers |
820-1763-A, 820-1975-A; treat these as board-family markings, not a complete fitment answer |
| Model family | Parts and specs references commonly use A1136 / EMC 2065; Apple's current identification page shows a conflicting A1238 entry for 5th-generation iPod with video |
| Variant match | Match removed board marking, order number, original capacity, RAM expectation, and thin/thick case or storage layout |
| RAM expectation | Generally 32 MB on 30GB boards; 64 MB on 60GB and 80GB boards, with supplier listings requiring exact variant confirmation |
| Cross-generation warning | Do not use 6th/7th-gen Classic boards as normal replacements for a 5th-gen Video board |
| Core chips | PortalPlayer PP5021C-TDF, Broadcom BCM2722, Wolfson WM8758BG audio CODEC |
| FireWire | Charge only; use USB for sync and restore |
Compatible order numbers
- **Original 5G 30/60 GB:** MA002LL/A (30GB, White, thin), MA146LL/A (30GB, Black, thin), MA003LL/A (60GB, White, thick), MA147LL/A (60GB, Black, thick) - **U2 5G 30 GB:** MA452LL/A (30GB, Black/Red, thin) - **Enhanced / 5.5 30/80 GB:** MA444LL/A (30GB, White, thin), MA446LL/A (30GB, Black, thin), MA448LL/A (80GB, White, thick), MA450LL/A (80GB, Black, thick) - **U2 Enhanced / 5.5 30 GB:** MA664LL/A (30GB, Black/Red, thin)After This Repair
After replacing this component, verify sync by connecting the iPod to the computer you plan to use with it.
Windows post-repair sync check: Apple's current iTunes guide says iPod classic/nano/shuffle syncing uses iTunes on Windows 10 or later. After repair, verify the USB cable, port, iTunes install, storage state, and dock path before blaming the logic board.
Repair Cautions
Check these cautions before forcing a repair or assuming a replacement part is bad.
Connector or ribbon reseat check
- If the symptom appeared after opening the iPod or replacing a part, inspect and reseat nearby ribbon cables and connectors before assuming the replacement part is bad
Install Difficulty
Moderate to difficult. Plan roughly 40 minutes to 2 hours. Repair guide: 20 steps. No soldering required. Common tools: Plastic opening tool, Phillips #00 screwdriver, Spudger. Full model-specific repair guide is included below. The hard part is fragile connector, ribbon, latch, and ground-strap handling.
Installation Checkpoints
- Open ribbon-cable latches only as described; over-lifting or side-loading the latch can damage the connector.
Repair Guide
Model-specific rewritten repair guide from iPod 5th Generation (Video) Logic Board Replacement.
Difficulty: Moderate to difficult | Time: 40 minutes to 2 hours | Steps: 20 | Soldering: No
Show all 20 installation steps
Before opening the iPod, confirm that the hold switch is locked. With the iPod screen-side down and facing you, the slider should sit all the way to the right.
Do not get discouraged if the iPod takes several opening attempts; work slowly until the case releases. Release the first bottom retainer clip with the plastic opening tool. Point the tool edge toward the metal rear case to avoid scratching the plastic front.
Use these retaining clip locations: four along each side, one on top, and two along the bottom. This helps avoid frustration and reduces the chance of scratching the plastic cover.
Each side of the iPod has four retaining clips. Use a plastic opening tool to separate the plastic front from the metal rear case. Slide the plastic opening tool into the iPod's left side with the tool edge pointed toward the metal rear case. A small guitar pick can help with opening. Place it in the seam and slide it around the case to release the clips more smoothly. Gently enlarge the existing crevice by wiggling the plastic opening tool and moving it to the left. Keep working this way until the entire side of the iPod is loose. Then slide a plastic opening tool to the right of the Hold button. Work very carefully while inserting the tool because the display is fragile.
Gently glide the plastic opening tool on the top of the display, making sure to release the retaining clips. The other sides of the iPod should now release easily. If they do not, work plastic opening tools along the right side the same way you did on the left side. In this step, separate the front of the device from the back about an inch (or a couple of centimeters). The iPod casing is now open, but do not fully separate the two halves yet. Two ribbon cables still connect the back panel to the remaining iPod assembly.
With angled tweezers or a plastic opening tool, slide the brown connector latch upward where it secures the orange battery ribbon cable. Pull from both sides of the latch. Lift it only about 1-2 mm to release the cable; do not lift farther or remove it, or the white connector may come with it. Do not raise the assembly very far; lifting too high could pull the battery connector out of the logic board. Move the brown connector straight upward. It is fragile and can break if shifted to the side. Hooks at the bottom hold the cable in place. If an arm breaks, reinstalling the battery cable becomes difficult; put the cable in the slot and press the brown holder into place to stop the cable from slipping out. Take the cable out of the connector.
At this stage there should be one orange ribbon cable still attaching the front housing to the back. At this stage you are able to take out and replace the blue rubber bumpers, or keep going with separating the case. You can replace the battery without separating the case, but opening it farther can make the work easier. Doing so requires one extra cable removal and adds some damage risk.
Raise the hard drive so the headphone jack ribbon connector is exposed. If the hard drive bumpers come loose, put them back with the notch seated in its original orientation.
With the plastic opening tool, gently raise the brown tab of the headphone ribbon cable connector. The tab can rotate up 90 degrees, releasing the ribbon cable. With your fingers, draw out the headphone jack ribbon cable.
The front and rear case halves should now be fully separated.
With a small plastic opening tool, release the black hinge clamping the hard drive ribbon cable. Rotate the tab upward 90 degrees toward the logic board to free the ribbon cable. With your forefinger, hold the ribbon cable in place; detach the drive from the ribbon cable. Confirm that the hard drive rubber side bumpers are installed on the drive. Use the side bumper installation guide for placement. If needed, transfer the blue foam padding from the hard drive to the replacement drive.
Take out the 3 black Phillips screws securing the front panel to the metal framework. Turn the iPod laterally 180 degrees and take out the three black Phillips screws that secure the front panel to the metal framework on the opposite side.
You may meet some resistance near the center of the device as you will find a mild adhesive used to help hold the two parts together. Carefully work along the iPod edge to separate the front panel from the metal framework. Lift the full framework away from the front panel; it carries the display, logic board, and click wheel. Confirm the click wheel button is seated before reinstalling the framework in the front panel.
The front panel should now be released from the remaining iPod assembly.
In this step, rotate the device so the black plastic tab is more accessible to you. Use a small plastic opening tool or fingernail to lift the black plastic tab that secures the display ribbon. The tab rotates upward 90 degrees toward the display and releases the ribbon cable. Use your finger to prevent the cable from lifting upwards. Rock the display loose from the frame, and next, draw it gently outwards to release the display's ribbon cable. You may have to raise the cable away from the 2 white pegs that poke through it near the side of the frame.
The display should now be released from the remaining iPod assembly. During reassembly, it is usually easier to seat the screen between the front panel and framework before connecting the cable. A new screen cable can be stiff enough to loosen the screen while the cable is being reconnected.
In this step, peel up the black tape holding the silver ground strap to the metal framework. The ground strap is very fragile, so make sure it does not break.
Turn the iPod over, then peel up the orange click wheel ground tab from the metal framework. Detach the thin ground tab only; do not detach the wider click wheel ribbon. Carefully press the logic board away from the metal framework, using the squares as push points. Mild adhesive secures the board to the framework, so avoid bending it by pushing too hard in one spot. The framework should now be free from the remaining iPod assembly.
With a small plastic opening tool, flip up the black plastic tab securing the orange click wheel ribbon in place. The black tab can rotate up 90 degrees, releasing the ribbon cable. With a small plastic opening tool, loosen the click wheel cable from the logic board. Take care not to over-bend the cable, since its electronics can be damaged. Detach the click wheel cable from of its connector, and raise the entire click wheel assembly away from the logic board. The click wheel should now be separate from the remaining iPod assembly.
With a small plastic opening tool, flip up the brown plastic tab securing the orange hard drive ribbon in place. The brown tab can rotate up 90 degrees, releasing the ribbon cable. Move the orange hard drive ribbon cable straight out of its connector. If adhesive holds the cable to the logic board, carefully pull up on the cable to loosen it. The logic board is the remaining assembly.
Common Questions
What are the most common signs of a bad logic board?
The strongest signs are a completely dead iPod after known-good power and battery checks, visible board corrosion, damaged board-side connectors, repeated failure with known-good storage and cable, or no audio from both headphone and dock after output-path checks. A single symptom by itself is not enough.
Is a completely dead 5G Video usually a logic board?
It can be, especially when there is no screen, no click, no drive spin, and no computer recognition after Hold-off/reset, known-good USB power, and battery checks. Still check the battery connector and dock path first because those failures can make the iPod look completely dead.
Is a sad iPod, red X, or error 1416/1417/1429 a logic-board symptom?
Usually start with storage. Reseat or test the hard drive, ZIF cable, flash adapter, SD card, formatting, and battery load before replacing the board. Restore or format can erase content. The board becomes more likely when known-good storage and cable still fail or the board-side storage connector is damaged.
When does no sound point past the headphone jack?
Compare headphone output with dock or line-out audio. If dock output is clean and headphones fail, start with the headphone/hold assembly. If both outputs fail after known-good output tests, keep the board-level audio path in scope.
Does a broken 30-pin dock connector mean I need a board?
Not automatically. Try known-good USB cables and ports, inspect the pins for debris, bends, or corrosion, and separate charging from sync or restore trouble. A damaged board-side dock path can become a board-level repair or board replacement decision.
Which board do I need?
Use the removed board marking plus order number, capacity/RAM, and case/storage layout. A1136 alone is not enough because it covers multiple 5G Video variants, and Apple's current ID page conflicts with common parts references.
You May Also Want
Check the battery route first when a 30GB thin iPod is dead, loops low battery, or only works on power.
Replacement Battery (Thick — 60/80GB)Check the thick-case battery route first on 60GB and 80GB iPods with no-power or runtime symptoms.
Hard Drive ZIF Ribbon CableA loose or damaged hard-drive ribbon can mimic storage and restore failures before the board is at fault.
Flash Storage Mod (iFlash Adapter + SD Card)Flash storage is the common upgrade path when storage warnings point away from the logic board.